
When we read news, blogs, social media we are used to visual clickable, scrollable layouts so why then are we still using static pdfs as the primary source of business communication? We rarely print anything, especially during these work from home times, so anything paginated is simply illogical. Although legally binding, signed contracts should probably remain as pdf’s, when it comes to anything more creative such as proposals, brochures, newsletters or certain reports, consumption through pdf feels prehistoric.
A Sway file can overcome all these boundaries whilst feeling similar to a blog article, plus intelligent behind the scenes changes means it looks equally good on a computer or any mobile device without the user needing to change anything. This is my first post dedicated to the underutilised Microsoft 365 apps.
Sways can contain text, interactive image slideshows, professionally animated designs, embedded PowerPoint slide decks, Excel files, videos and more, but where Sway stands out is that it uses machine learning algorithms to determine how your content fits together meaning that beautiful designs can be created in minutes (which would take hours if the same attempts were made in PowerPoint). The best part though is that you can convert an existing word doc to a Sway file almost as quickly as you can convert to it to a pdf, as show in this short intro video:
Examples
This first example comes from a promo for an Excel training course which I recently ran, there is an embedded Excel workbook, Form, videos, interactive images etc.
Getting started
Navigate to Sway and you could add a blank Sway or choose “Start from a Document” my preferred method mentioned more below.
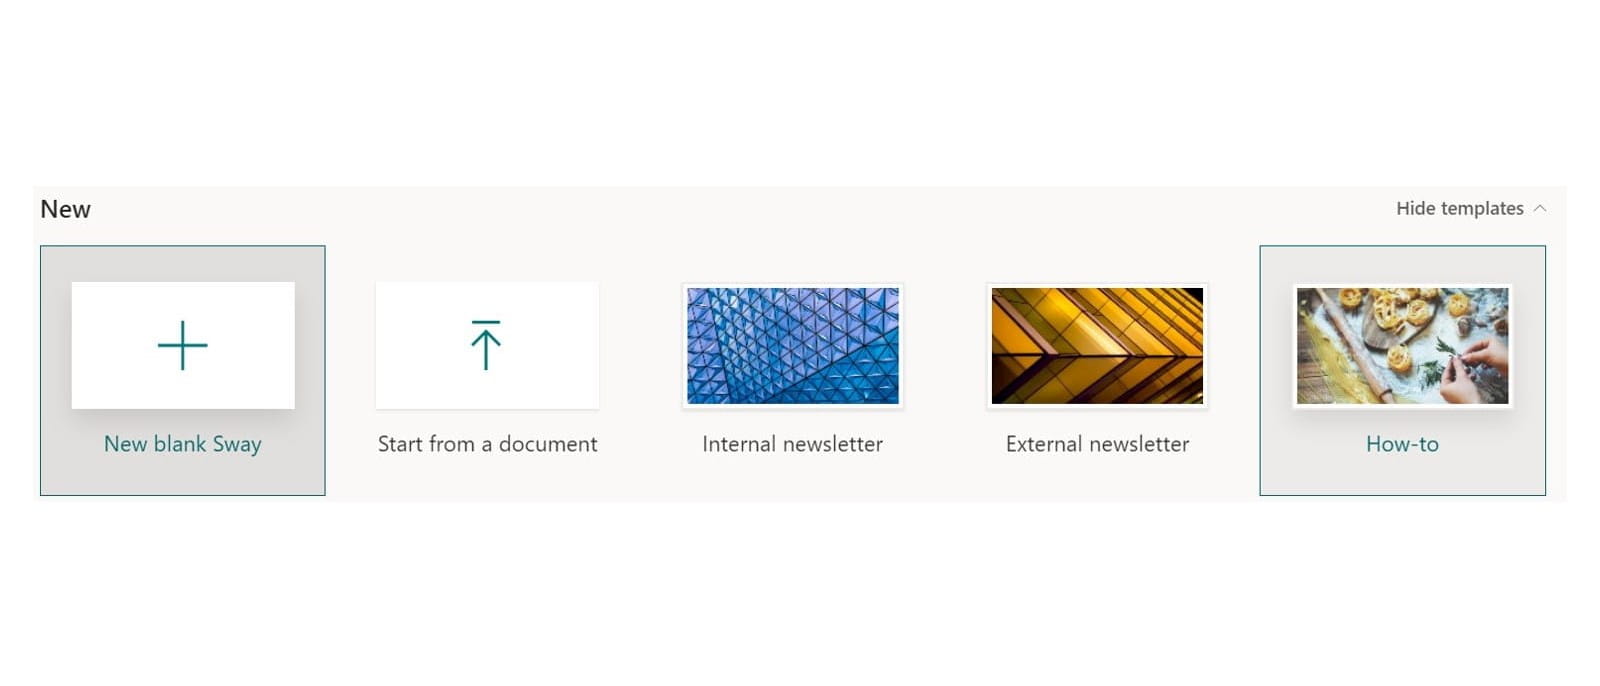
Starting from a document
Although you can import a Word, a PowerPoint or pdf file, I find that importing a Word works best. When setting up your Word doc though, use a text layout, bullets and numbering are OK but avoid headers/footers or tables. As a Pro tip, I have found that setting paragraph headings as just text (no bold or underline etc.) imports them as text only which is better as you can more easily manipulate them in Sway.
This video tutorial shows how to get from a Word doc to a Sway & make it look professional.
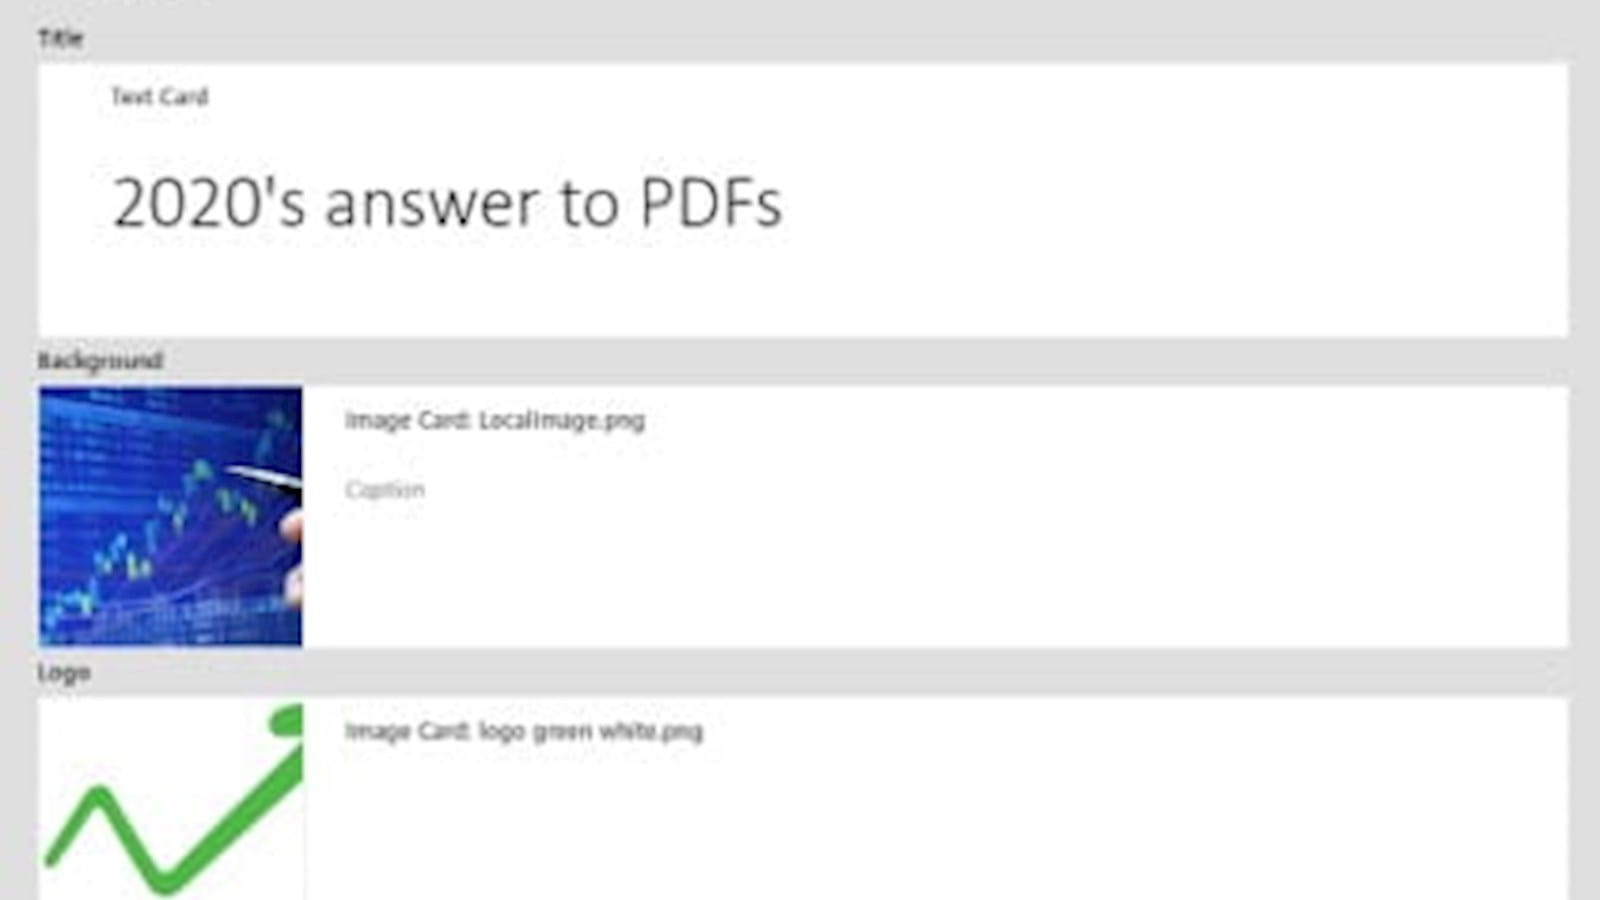
Setting up the document title
Sway’s title card is a special type. It is usually collapsed by default, but you can expand by clicking the triangle on top left. My recommendation is adding a relevant background and uploading a company logo (ideally with a transparent background). The image can often appear to be moving slightly behind the text (a feature called the Ken Burns effect in graphic design).
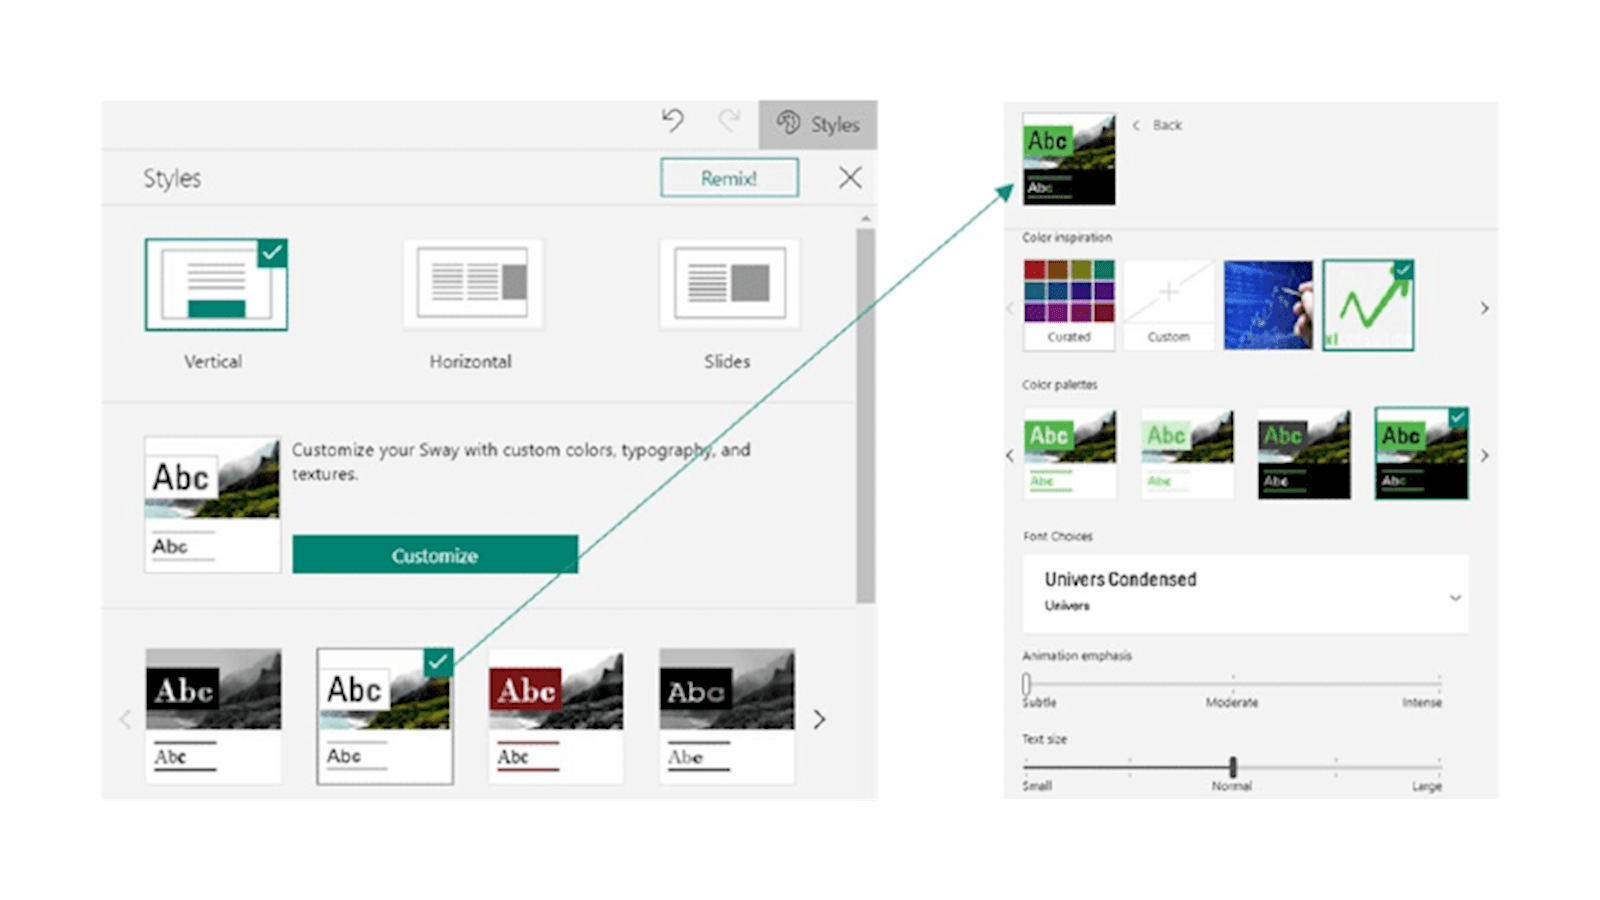
Customise the style
Where Sway gets its life is the style. You set up one style and the entire document will flow accordingly. On the top left, you have two views. Storyline and Design, the latter is mostly used for the style choice. Click on the Design tab on the right, then the “Styles” tab on the right underneath. Sway has had a big uptake in education so many built in styles are playful rather than professional, rows 1, 3 and 4 work well for a professional design. The Styles pane will uncover is a grid of seven rows (each row has several features associated with it such as how it deals with animations, bolding text, backgrounds etc.) and each row has a dozen or so sub designs to choose from (rows 1-4 are shown here).
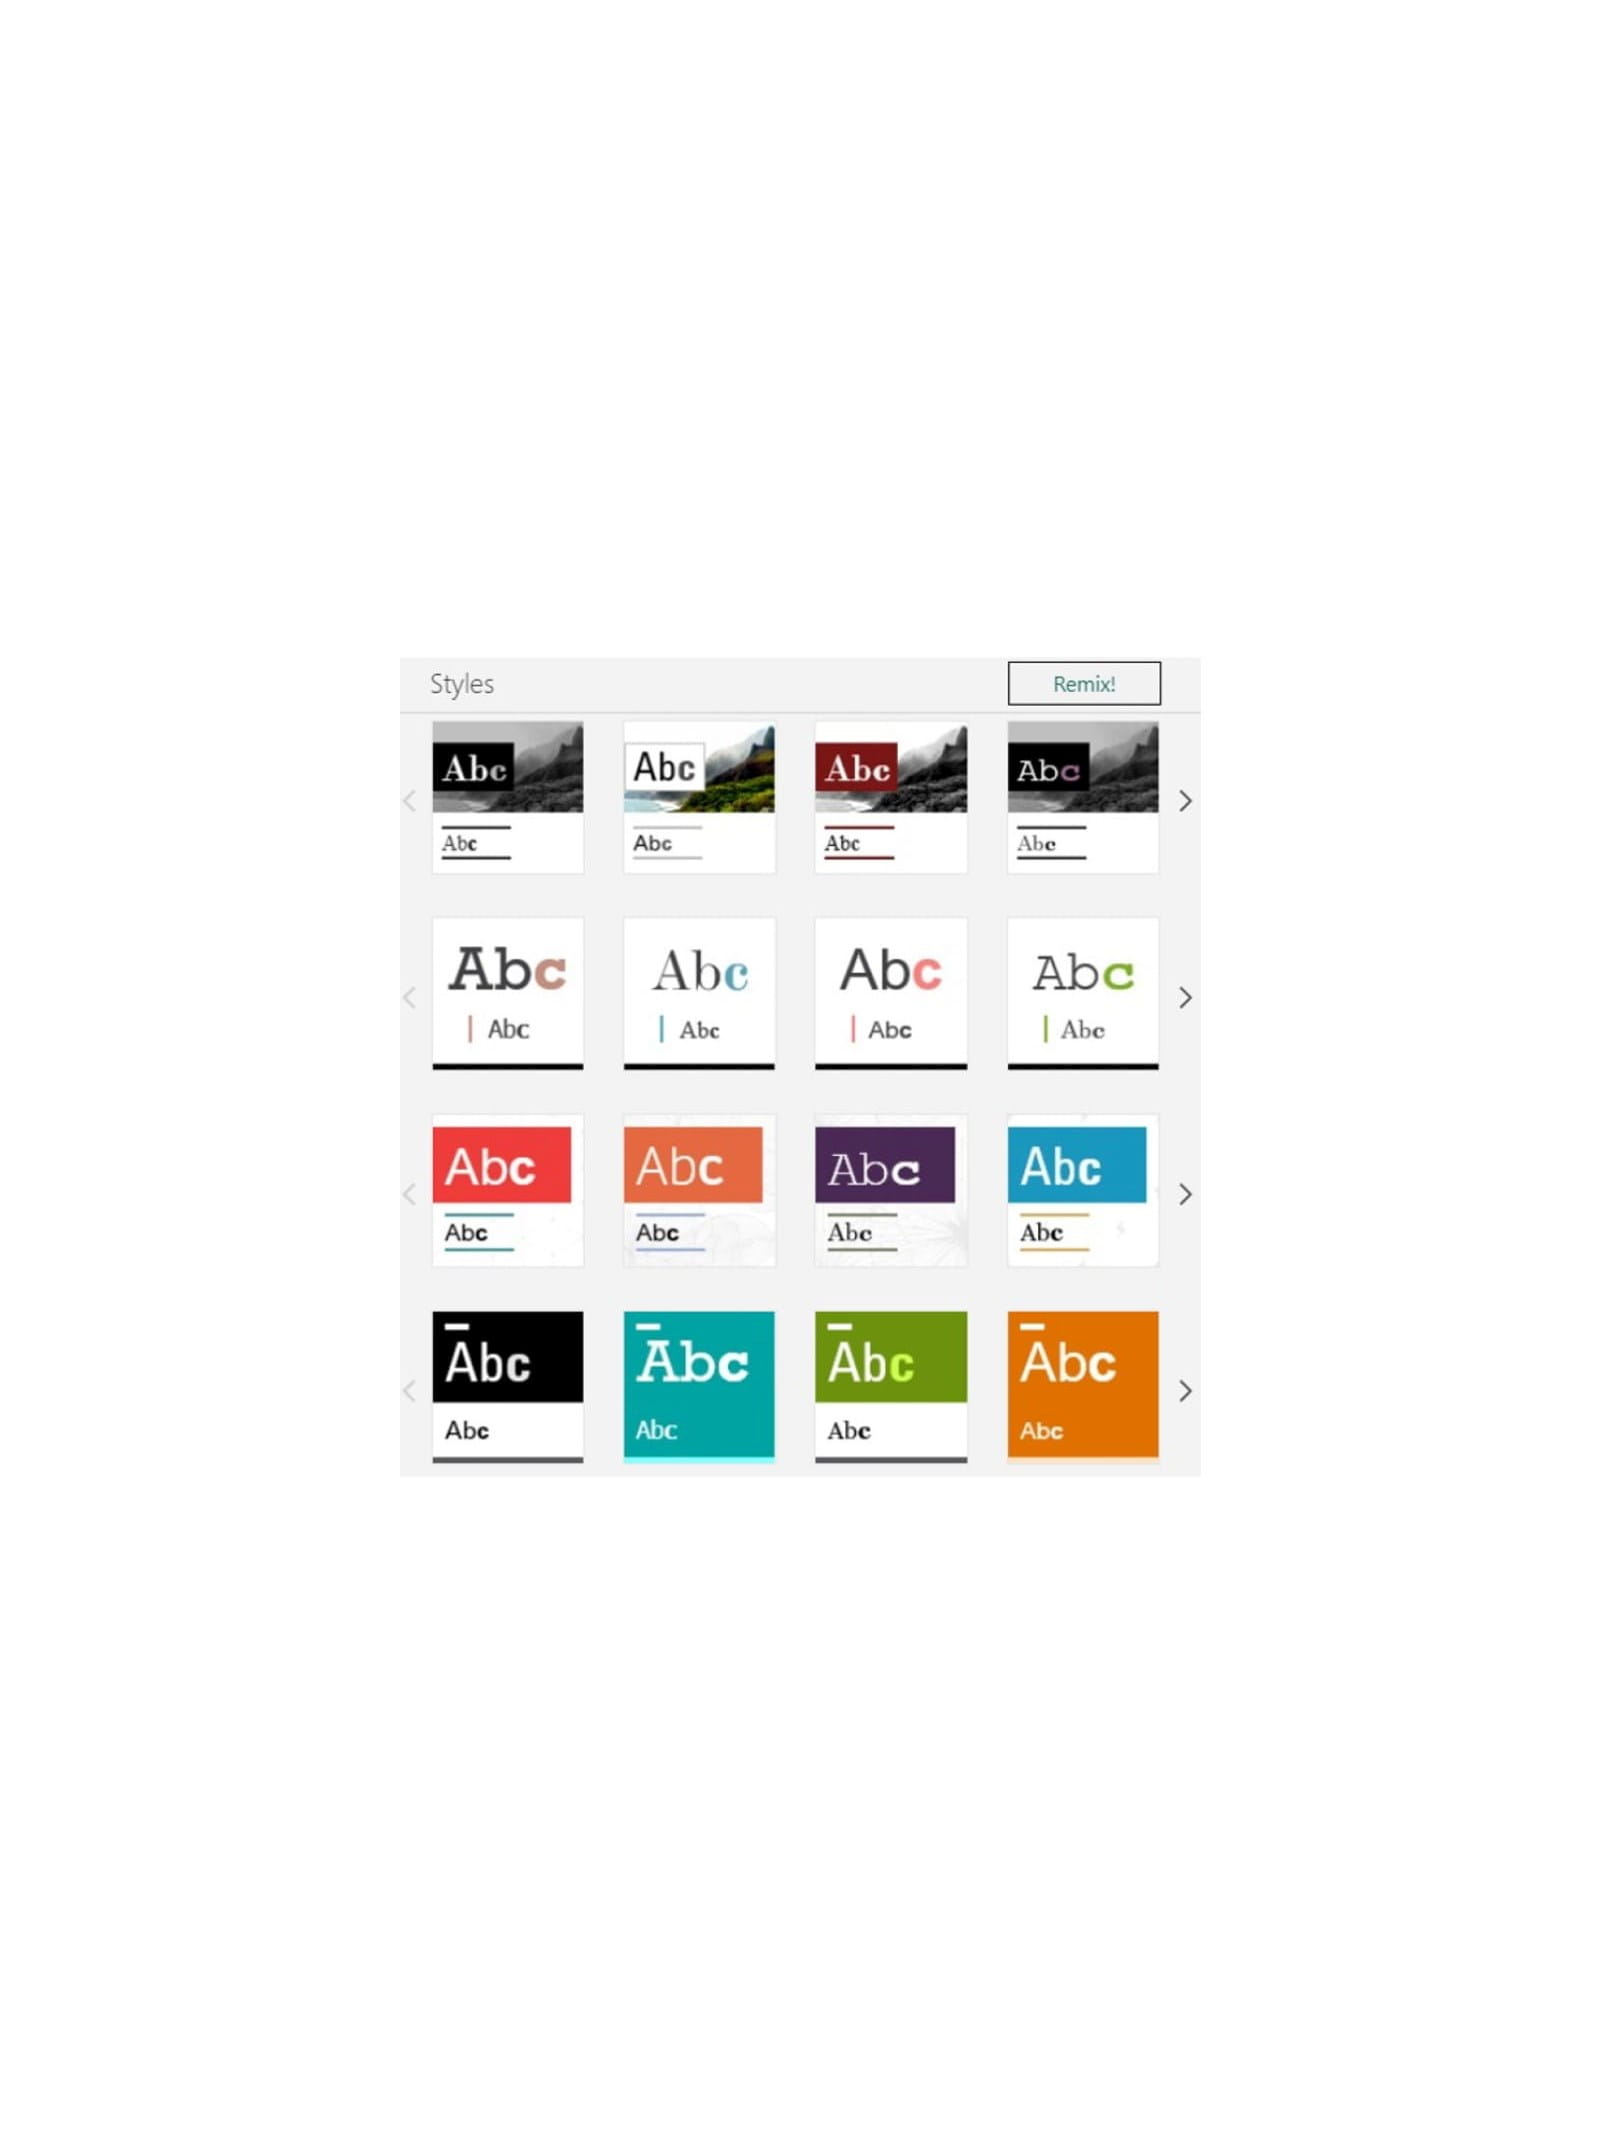
I typically opt for second option from the first row, but then customise it to match my company branding, by clicking customise, and then:
1. Choose to extract a single prominent colour. You may choose a custom colour or one from an image, perhaps your logo
2. The colour palette options will generate with your chosen prominent colour, plus black, white, and grey. With professionalism, subtlety works well so keep the “Ab” in white/black only (as in the selected option) as this will be the main colour of your text. My preference is the one selected which has a black background, white text, and the prominent colour is in headers and emphasised text (explained below).
3. Turn the animation emphasis right down to the minimum and optionally choose your fonts.
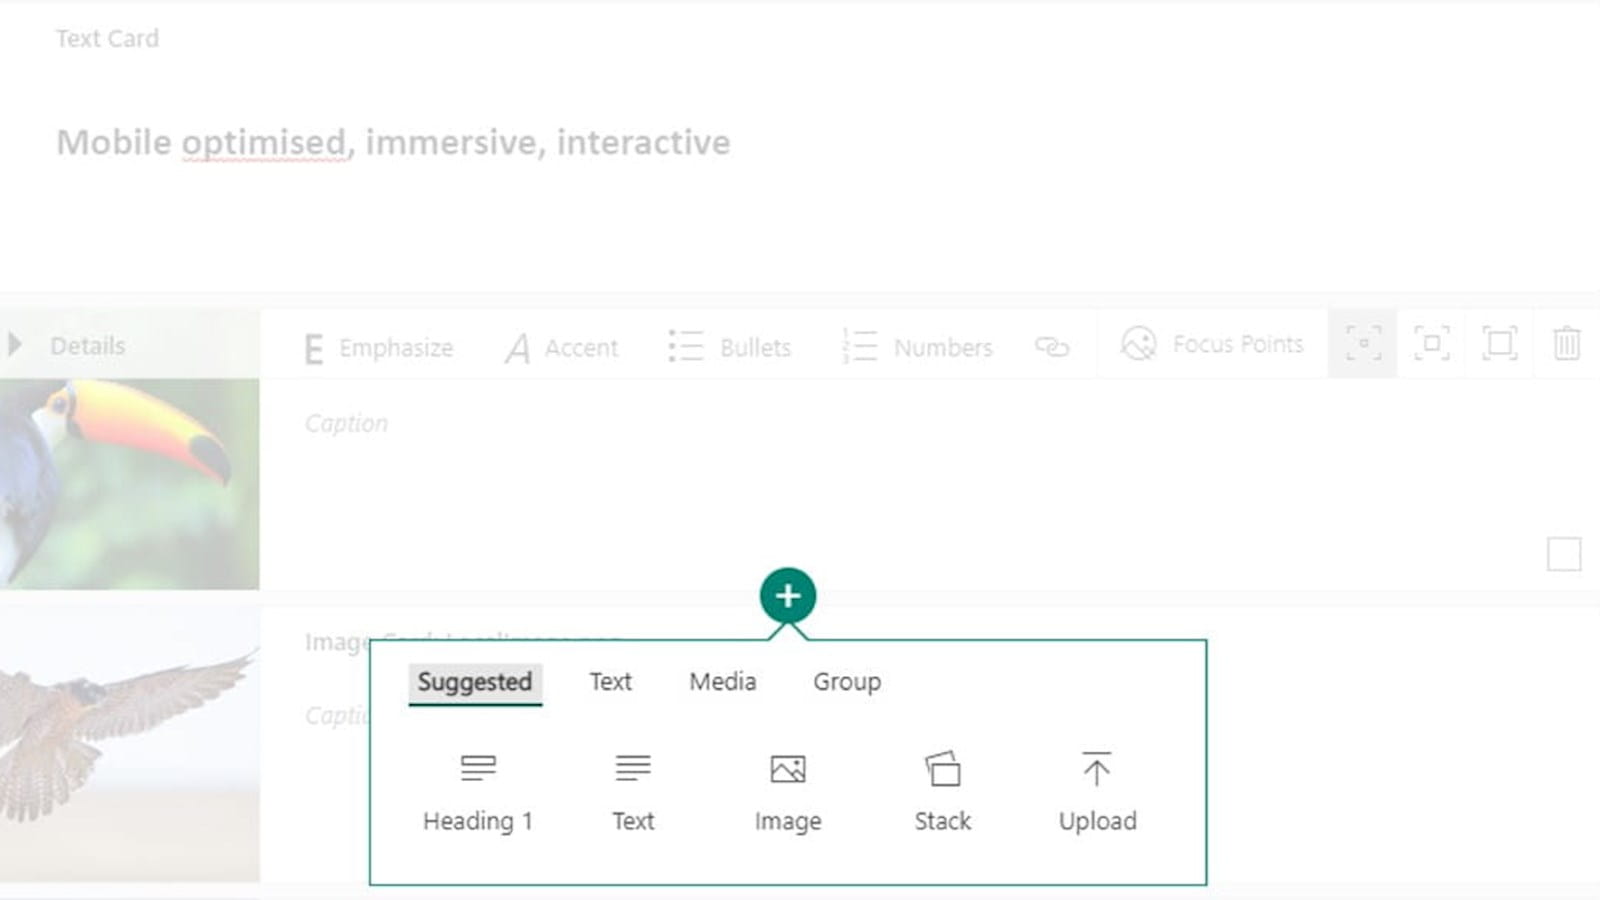
Text
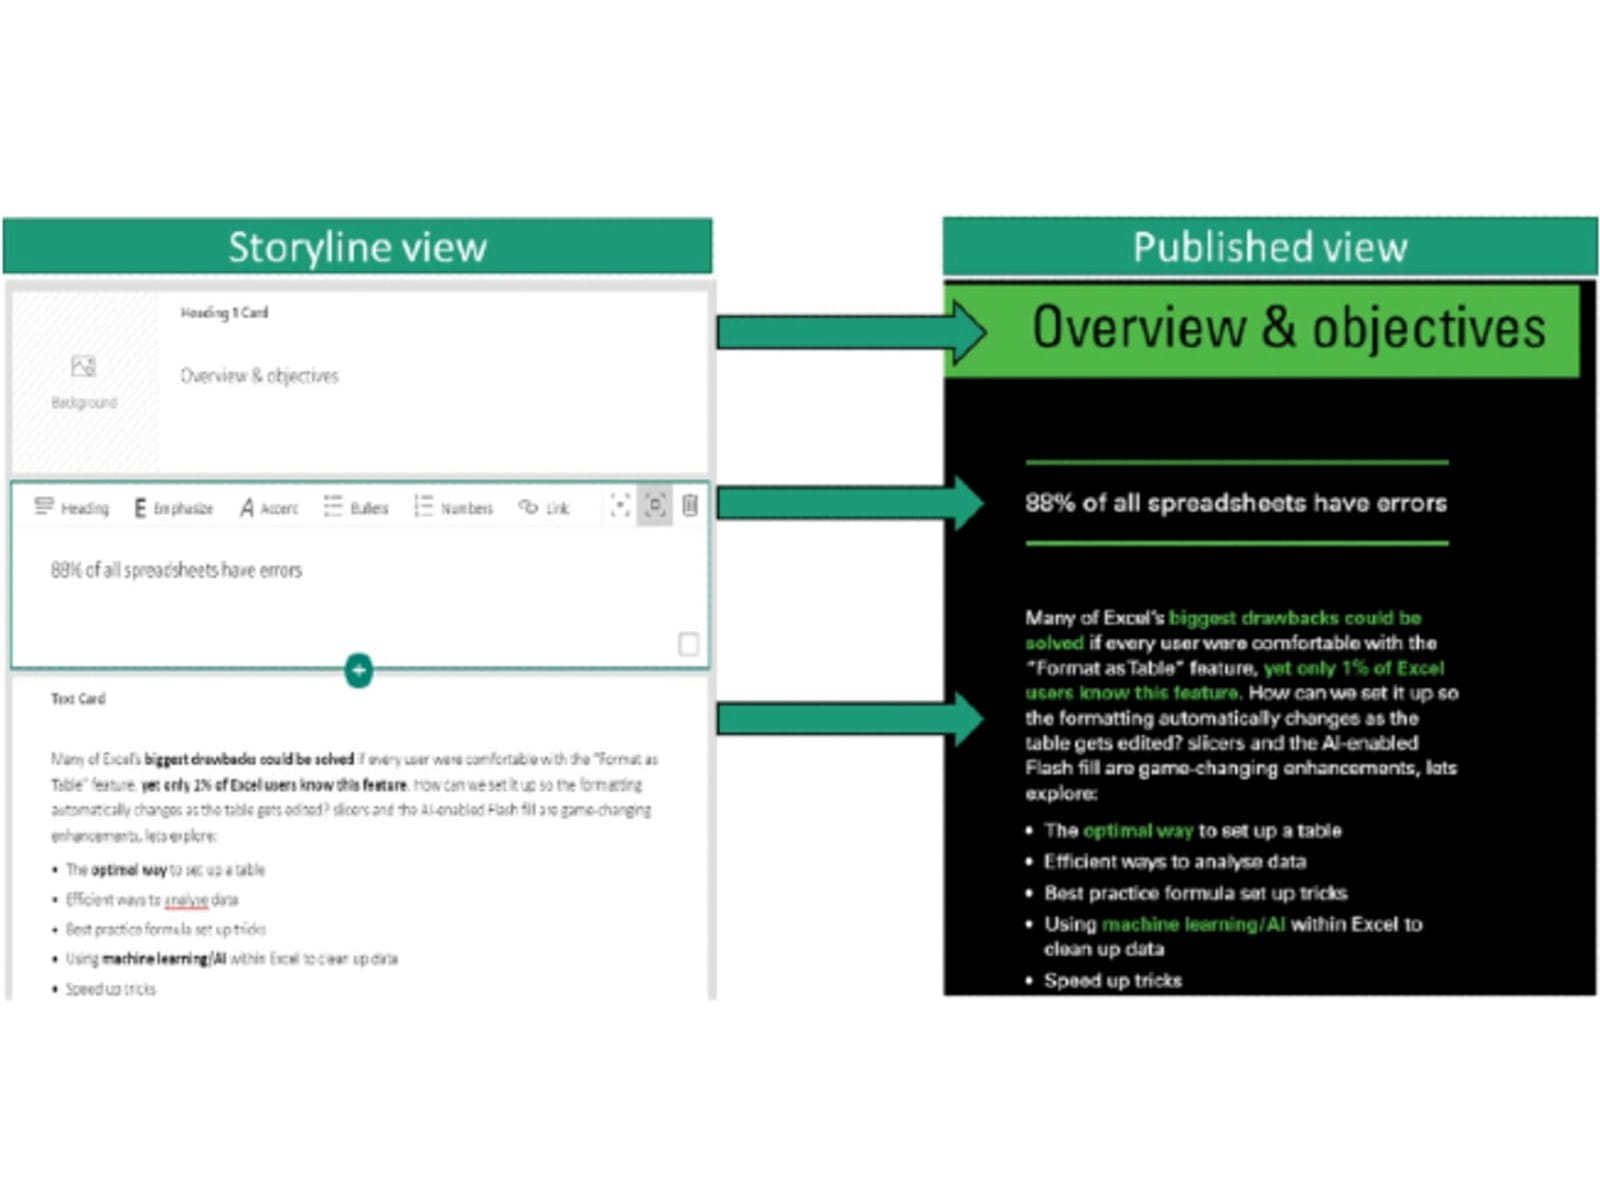
You can add text in the Storyline view, click the + button between sections and choose Heading 1 (which animates), heading 2 (which does not) or a regular text card.
Emphasis is an interesting Sway only feature, you may change the emphasis of the entire card, or just certain words/phrases. Here, the top card is heading 1, the second is an emphasised card, and the lowest card has just a few phrases with emphasis turned on (note in Storyline mode, this appears as bolded text).
Images
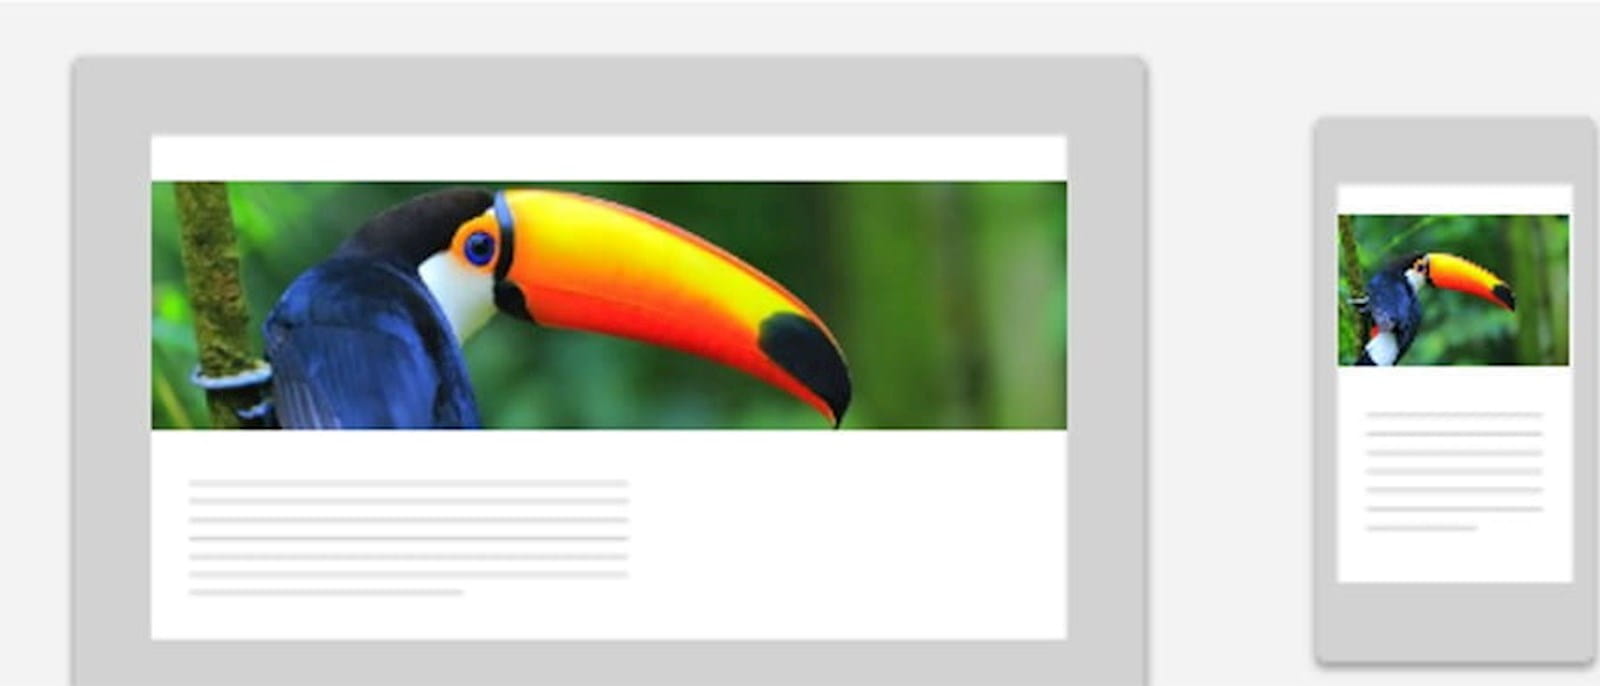
Sway has a built-in image search & video engine (linked to Bing) so you can find content without leaving Sway, videos are all from YouTube. Alternatively, you can paste in any of your own images. You are probably used to placing the image exactly where you want it to go, but as Sway does not let you do this, it uses machine learning algorithms to intelligently place the image where it fits best, based on its size, dimensions and features and have a strategy which works across all devices. You have some control though, mostly achieved through grouping (see below). You can change the emphasis of an image card as you can with text, but I generally keep the default option to avoid it getting too loud, you can also choose your “focus points”, the key areas which Sway will always show regardless of what screen size is used for viewing (you will see a preview). Choosing “this entire image is important” will ensure the whole image is always shown, which is an option I regularly use.
Adding embedded content
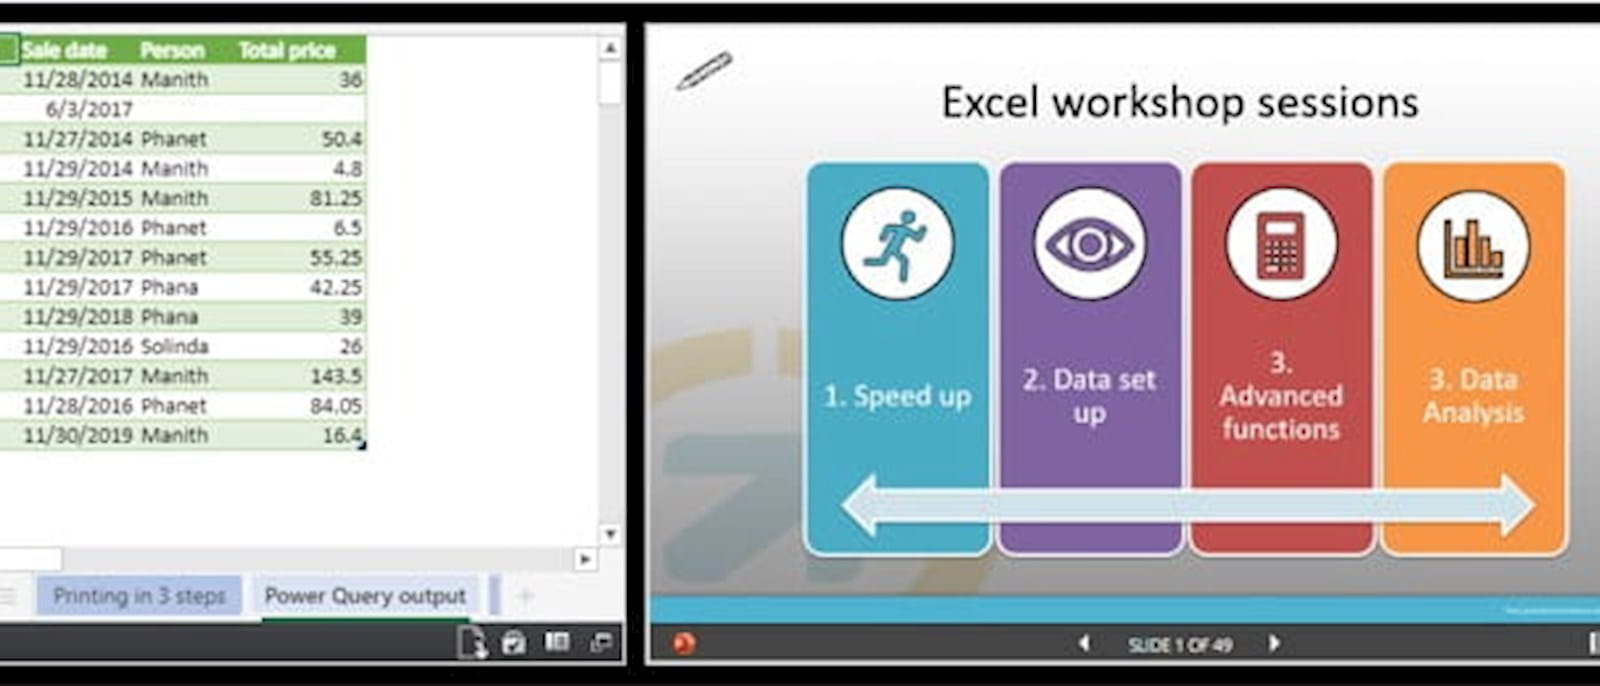
From Excel/PowerPoint/Word online click File>Share>Embed and copy the code. PowerPoint & Word give you limited options, but Excel gives you quite a few controls, you can share the entire workbook, a cell range, a Table or Pivot Table as shown and pick whether people can download the file. In Excel, a viewer still sees your entire file though, even if you choose to block a download link and share only a few cells, if a viewer explores the buttons underneath the embed code.
If you want anyone with a link to view it, you must store the file on a personal OneDrive account and share as a public link, this is not currently possible with OneDrive for Business. If it is shared with specific people though, this can be done through your business OneDrive/SharePoint though.
Grouping
Create some captivating effects by grouping your cards. Click on the bottom right of multiple then choose “group”, and a grouping pane will open with the various group options. Slideshow options are handy for grouping multiple images, especially the lowest option with thumbnails of all available images plus the comparison provides a slider so the user can scroll between a before & after scenario.

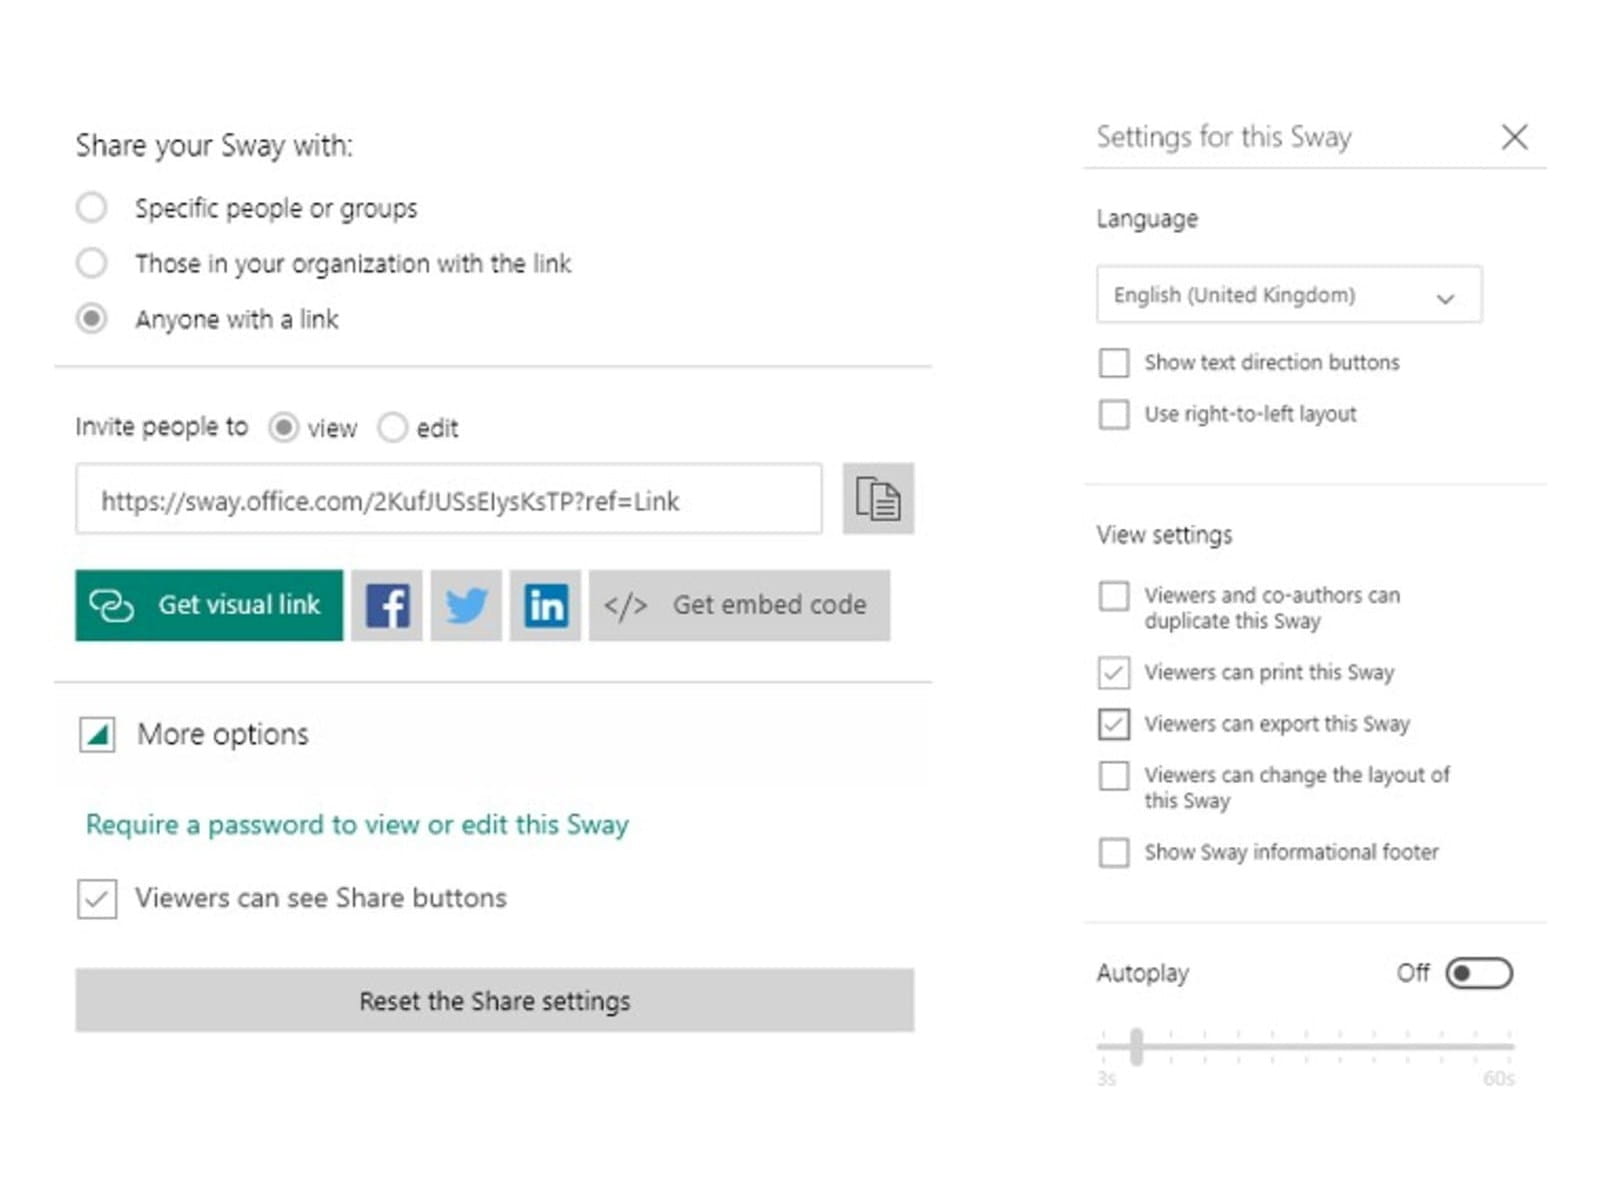
Sharing a Sway
You can choose who to share it with (per the options shown) and optionally can password protect it for more security.
Before sharing a Sway though, I recommend restricting what viewers can do. Click the 3 dots on the top right then “settings for this Sway”, and select as shown, remove the “made by Sway…” by unchecking the “informational header” box then allow viewers to print or export, but not to duplicate.
Excel community
This article is brought to you by the Excel Community where you can find additional extended articles and webinar recordings on a variety of Excel related topics. In addition to live training events, Excel Community members have access to a full suite of online training modules from Excel with Business.

Archive and Knowledge Base
This archive of Excel Community content from the ION platform will allow you to read the content of the articles but the functionality on the pages is limited. The ION search box, tags and navigation buttons on the archived pages will not work. Pages will load more slowly than a live website. You may be able to follow links to other articles but if this does not work, please return to the archive search. You can also search our Knowledge Base for access to all articles, new and archived, organised by topic.
