
Hello and welcome to the Excel Tips and Tricks! This week, we are back with a Creator level post in which we are looking at specific examples of using the new TEXTBEFORE and TEXTAFTER functions in Excel.
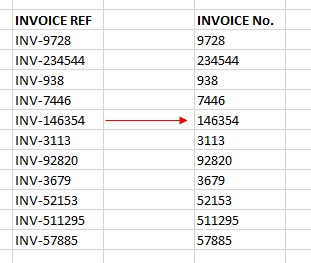
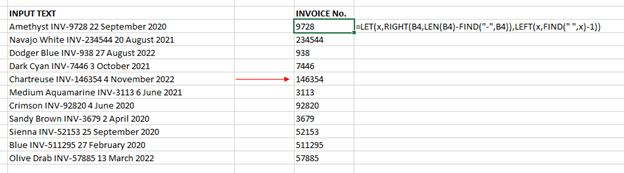
For example, here we want to extract only the invoice number from a list of invoice references.
The “traditional” approach
Before the release of the new text functions in Excel we might have approached this kind of problem with some combination of the following functions:
RIGHT – pick out a number of characters on the right-hand side
LEFT – pick out a number of characters on the left-hand side
MID – pick out a number of characters in the middle
LEN – return the length of the text (number of characters)
Let’s walk through the logic here. In this example we want to pick out the number, which is on the right-hand side, so we can expect to use the RIGHT function.
There is an added complication here in that we don’t know how many characters we need to pick. The invoice number could be anywhere between three and six digits long.
However, we do know that the text on the left-hand side “INV-“ is of a fixed length – it is four characters long - so we can exclude that by subtracting four from the overall length of the text.
Our formula then becomes:
=RIGHT(B4,LEN(B4)-4)
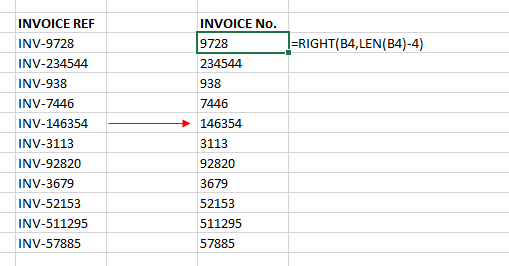
It doesn’t exactly trip off the tongue, and there is a bit of thinking involved in calculating the full length of the text and then excluding the unwanted characters.
Using the new TEXT functions
There is a new approach we can use, taking some functions that have recently been introduced into Excel:
TEXTBEFORE – pick out text before a delimiter
TEXTAFTER – pick out text after a delimiter
In this case we can simply pick out the text after our delimiter (being the dash symbol) and our formula becomes TEXTAFTER(B4,”-“).
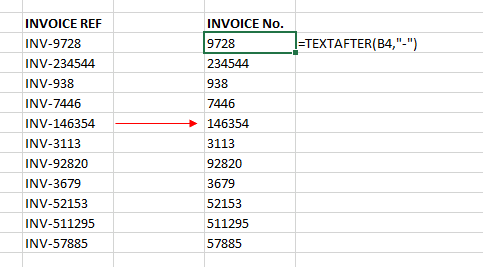
This is significantly easier to understand and avoids having to use multiple functions and nesting one inside the other!
A more colourful example
Our client is an interior designer and has purchased tins of paint of various colours. Our input text now includes the paint colour before the invoice number (on the left-hand side) and the date of purchase (on the right-hand side).
As with the previous example we are aiming for the same end result – to pick out the invoice number – but this requires a more sophisticated approach as the invoice number is buried in the middle of the text.
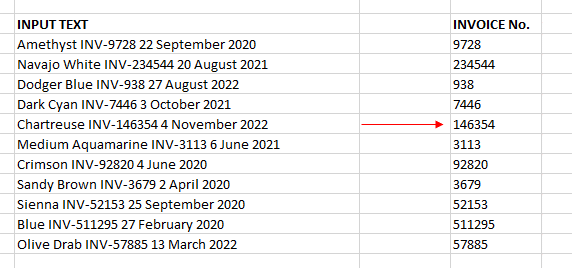
Thankfully, the new Excel functions come to the rescue here. Firstly, we can “chop out” everything to the left of the delimiter (dash symbol) by using TEXTAFTER(B4,”-“).

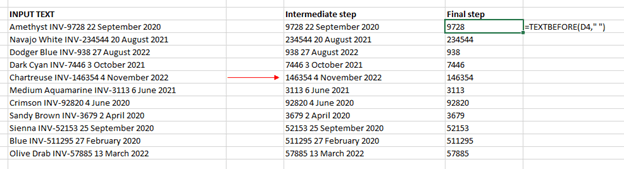
And voila we have the desired result! We can easily combine these two steps into one by using the following formula:
=TEXTBEFORE(TEXTAFTER(B4,"-")," ")

Alternative approaches
There are many ways to split text in Excel. For example, you could use PowerQuery, or the ‘Text To Columns’ feature, or even the ‘Auto Fill’ option. These are all good solutions in the right circumstances. However, if your spreadsheet requires a more dynamic solution, it is hard to find a better approach than Excel functions, as they are built directly into the worksheet and refresh automatically with any new data inputs.
- Excel Tips and Tricks #506: Creating a single master list after merging data
- Excel Tips and Tricks #505 – 3 ways of converting US Dates into UK formats
- Excel Tips and Tricks #504 - Accessing accessibility checkers for good spreadsheet practice
- Excel Tips and Tricks #503 – Printing under pressure, super quick presentation tips
- Excel Tips and Tricks #502
Archive and Knowledge Base
This archive of Excel Community content from the ION platform will allow you to read the content of the articles but the functionality on the pages is limited. The ION search box, tags and navigation buttons on the archived pages will not work. Pages will load more slowly than a live website. You may be able to follow links to other articles but if this does not work, please return to the archive search. You can also search our Knowledge Base for access to all articles, new and archived, organised by topic.
