
Hello and welcome to a new series from the Excel Community's Financial Modelling committee, in which we will work through the chapters of our Financial Modelling Code and explain how each element translates into practice.
You can read the Code here or watch our free webinar about it.
The layout and structure of a model is arguably the most important piece of a model. It is the foundation on which the rest of the model is built: the model infrastructure. And, for the purposes of this article, we can view this infrastructure from two different perspectives, the breaking out of the different functions of the model into different sheets – i.e. the workbook infrastructure; and then the layout within the sheets themselves, the worksheet infrastructure.
Just like a city where there are arterial routes which determine how different suburbs are connected, each suburb should still have organisational principles within them. After all, you wouldn’t want a school located next to a jail. You want your model to be thought out from the get-go; a New York, not a haphazard Los Angeles.

So, with this framework in mind; let’s proceed with the most important workbook infrastructure principles.
Workbook infrastructure: Separating the functionality of a model
The model is made up of different modules, which interact to calculate the desired outputs. For example, here’s what the key modules in a Corporate Model might look like:
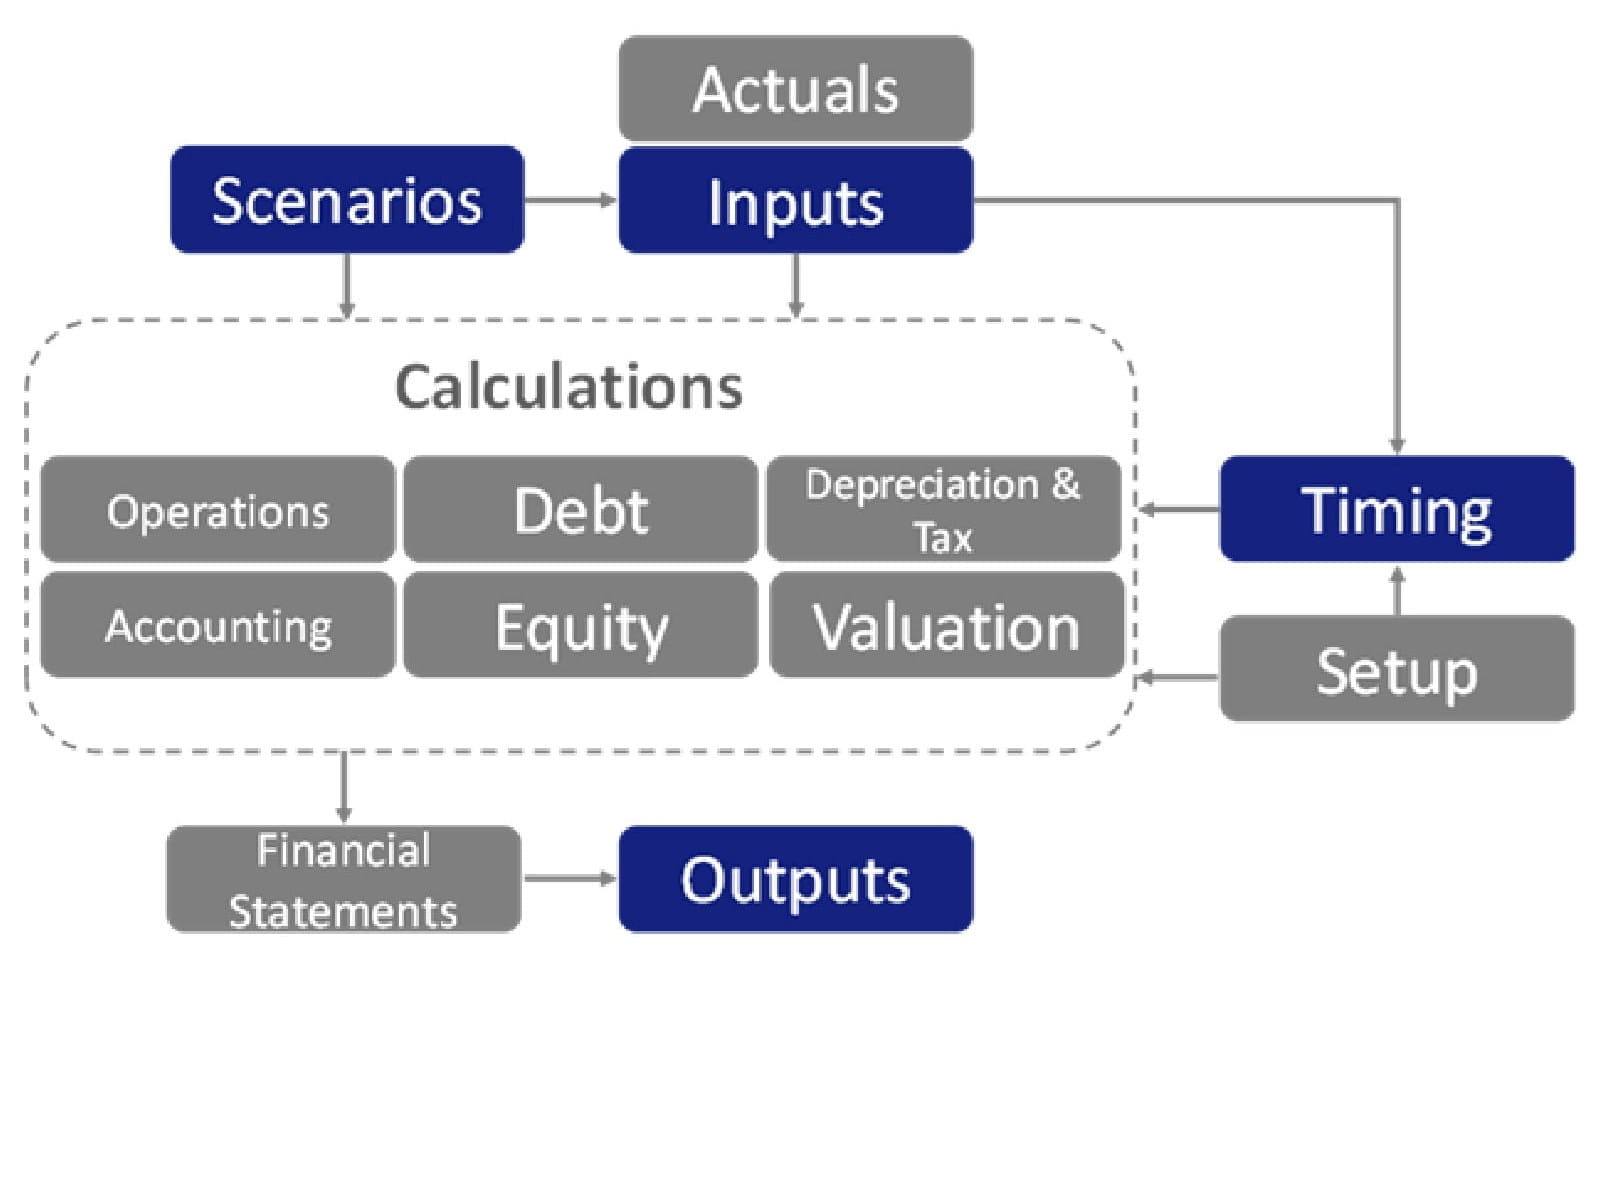
Each block in the diagram (e.g. Scenarios, Inputs, Timing, Outputs, Operations) represents a module. In terms of model infrastructure, you’ll often find that each module is broken out on a separate worksheet (although sometimes calculations modules may be combined for example Debt & Equity might form a Funding worksheet).
Also please note; this diagram is not exhaustive. There may be a few extra modules depending on what you’re modelling – for example a Project Finance model will likely have a dedicated construction module, as it will be required to calculate Sources & Uses of funds.
Regardless, if you zoom out, you’ll often see this more generally represented as:
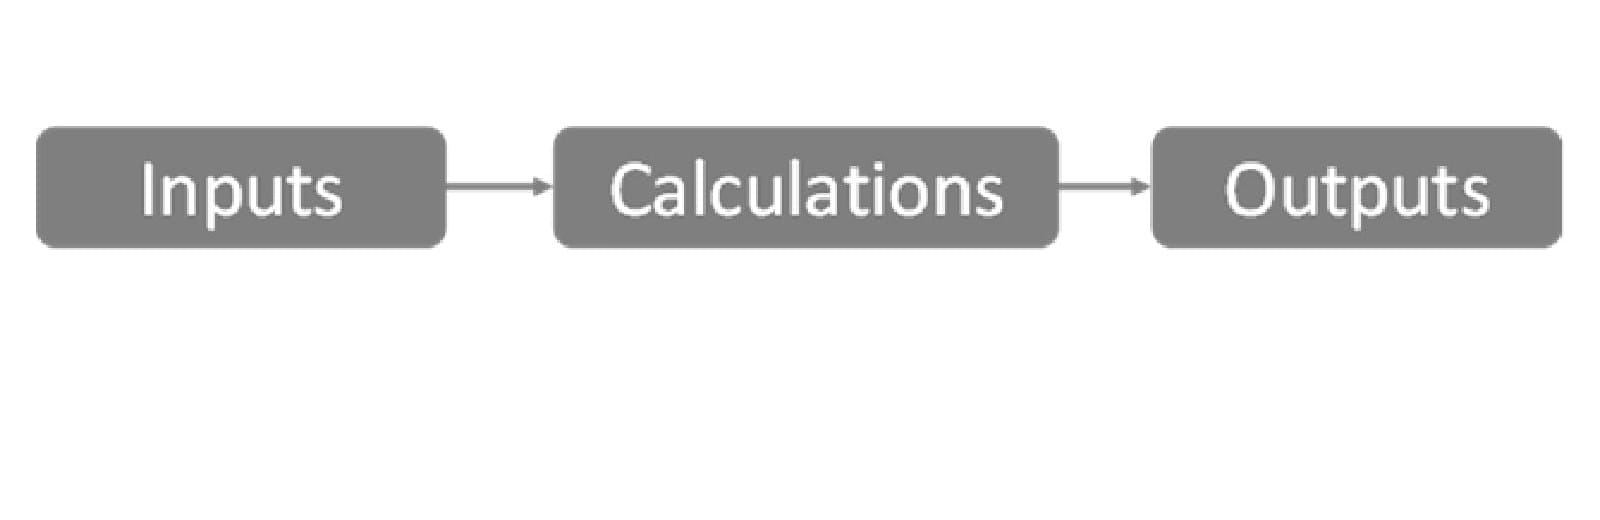
Inputs, Scenarios, Setup & Actuals in the former diagram become “Inputs” in the simplified diagram, Calculations are as contained in the dotted box, and Financial Statements & Outputs become “Outputs” in the simplified diagram.
The Code contains a range of guidance on how to layout a workbook, I want to highlight four modules (featured in blue in the diagram above) I think are fundamental when laying down those arterial routes:
Timing sheet
The timeline is really what any forecasting or planning model hangs on. One of the most important structural considerations is answering the question: “what periodicity do I want my model timing to have?” – should it be annual, quarterly, or monthly? Get it too granular, and it’s hard to see the forest from the trees, get it too coarse and it may no longer be a meaningful representation of the underlying asset. A good rule of thumb is to match to the reporting periods for key stakeholders, for example for lenders; timed to your debt repayments and therefore quarterly or semi-annual. Where actual management information is going to be incorporated then the frequency and format of that should be considered. Generally (and there are exceptions), I’d advise that the periodicity be constructed at the lowest common denominator time unit, with outputs summarised from that on different bases if required.
Inputs
The well-worn adage is to separate inputs from outputs (it’s #10 of the 20 Principles for Good Spreadsheet Practice). This is generally a very good idea. A model should support understanding and decision making – it needs to build trust (that it does what is intended) and should have flexibility (it can be modified as the underlying behaviour changes). Having inputs spread across different locations in a model is risky – the user could easily forget to update them. That doesn’t necessarily mean they are located on separate sheets from the calculations – in smaller models it can be an advantage to see the impact of a change in calculations as one makes the change. However, practically speaking if the model is big enough that inputs take up more than one screen, that usually justifies a separate sheet or sheets (for example a model might have adjacent input template sheets for sister business units). The key point being to keep them in one place and clearly identified.
Outputs & scenario manager
Just imagine a beautifully presented outputs page, which gives you the user, in a flash, the big picture behind an asset or company. Imagine being able to confidently toggle inputs via a scenario manager and see how the graph of revenue vs costs responds or how debt get paid back. This goes a long way in improving ones feel over an underlying asset or company. A well-designed output sheet (and scenario manager!) can give you this at your fingertips. This is where models come into their own, giving stakeholders a lens onto the business and pulling the key business insights out of an often very detailed fact base. Note that key inputs are often included on output dashboards – if very clearly signposted this is not a threat to the above rule about separating them out.
Those three are the big-ticket layout and structure items from a workbook perspective. Let’s now delve into each sheet, and investigate the important things to get right.
Worksheet infrastructure: Within each calculation sheet
As above, I’ve picked out three areas that I think are vital for organising the layout and content of your model’s metaphorical suburbs. Per the diagram above, these represent within each worksheet (e.g. operations) – and therefore within each module & block.
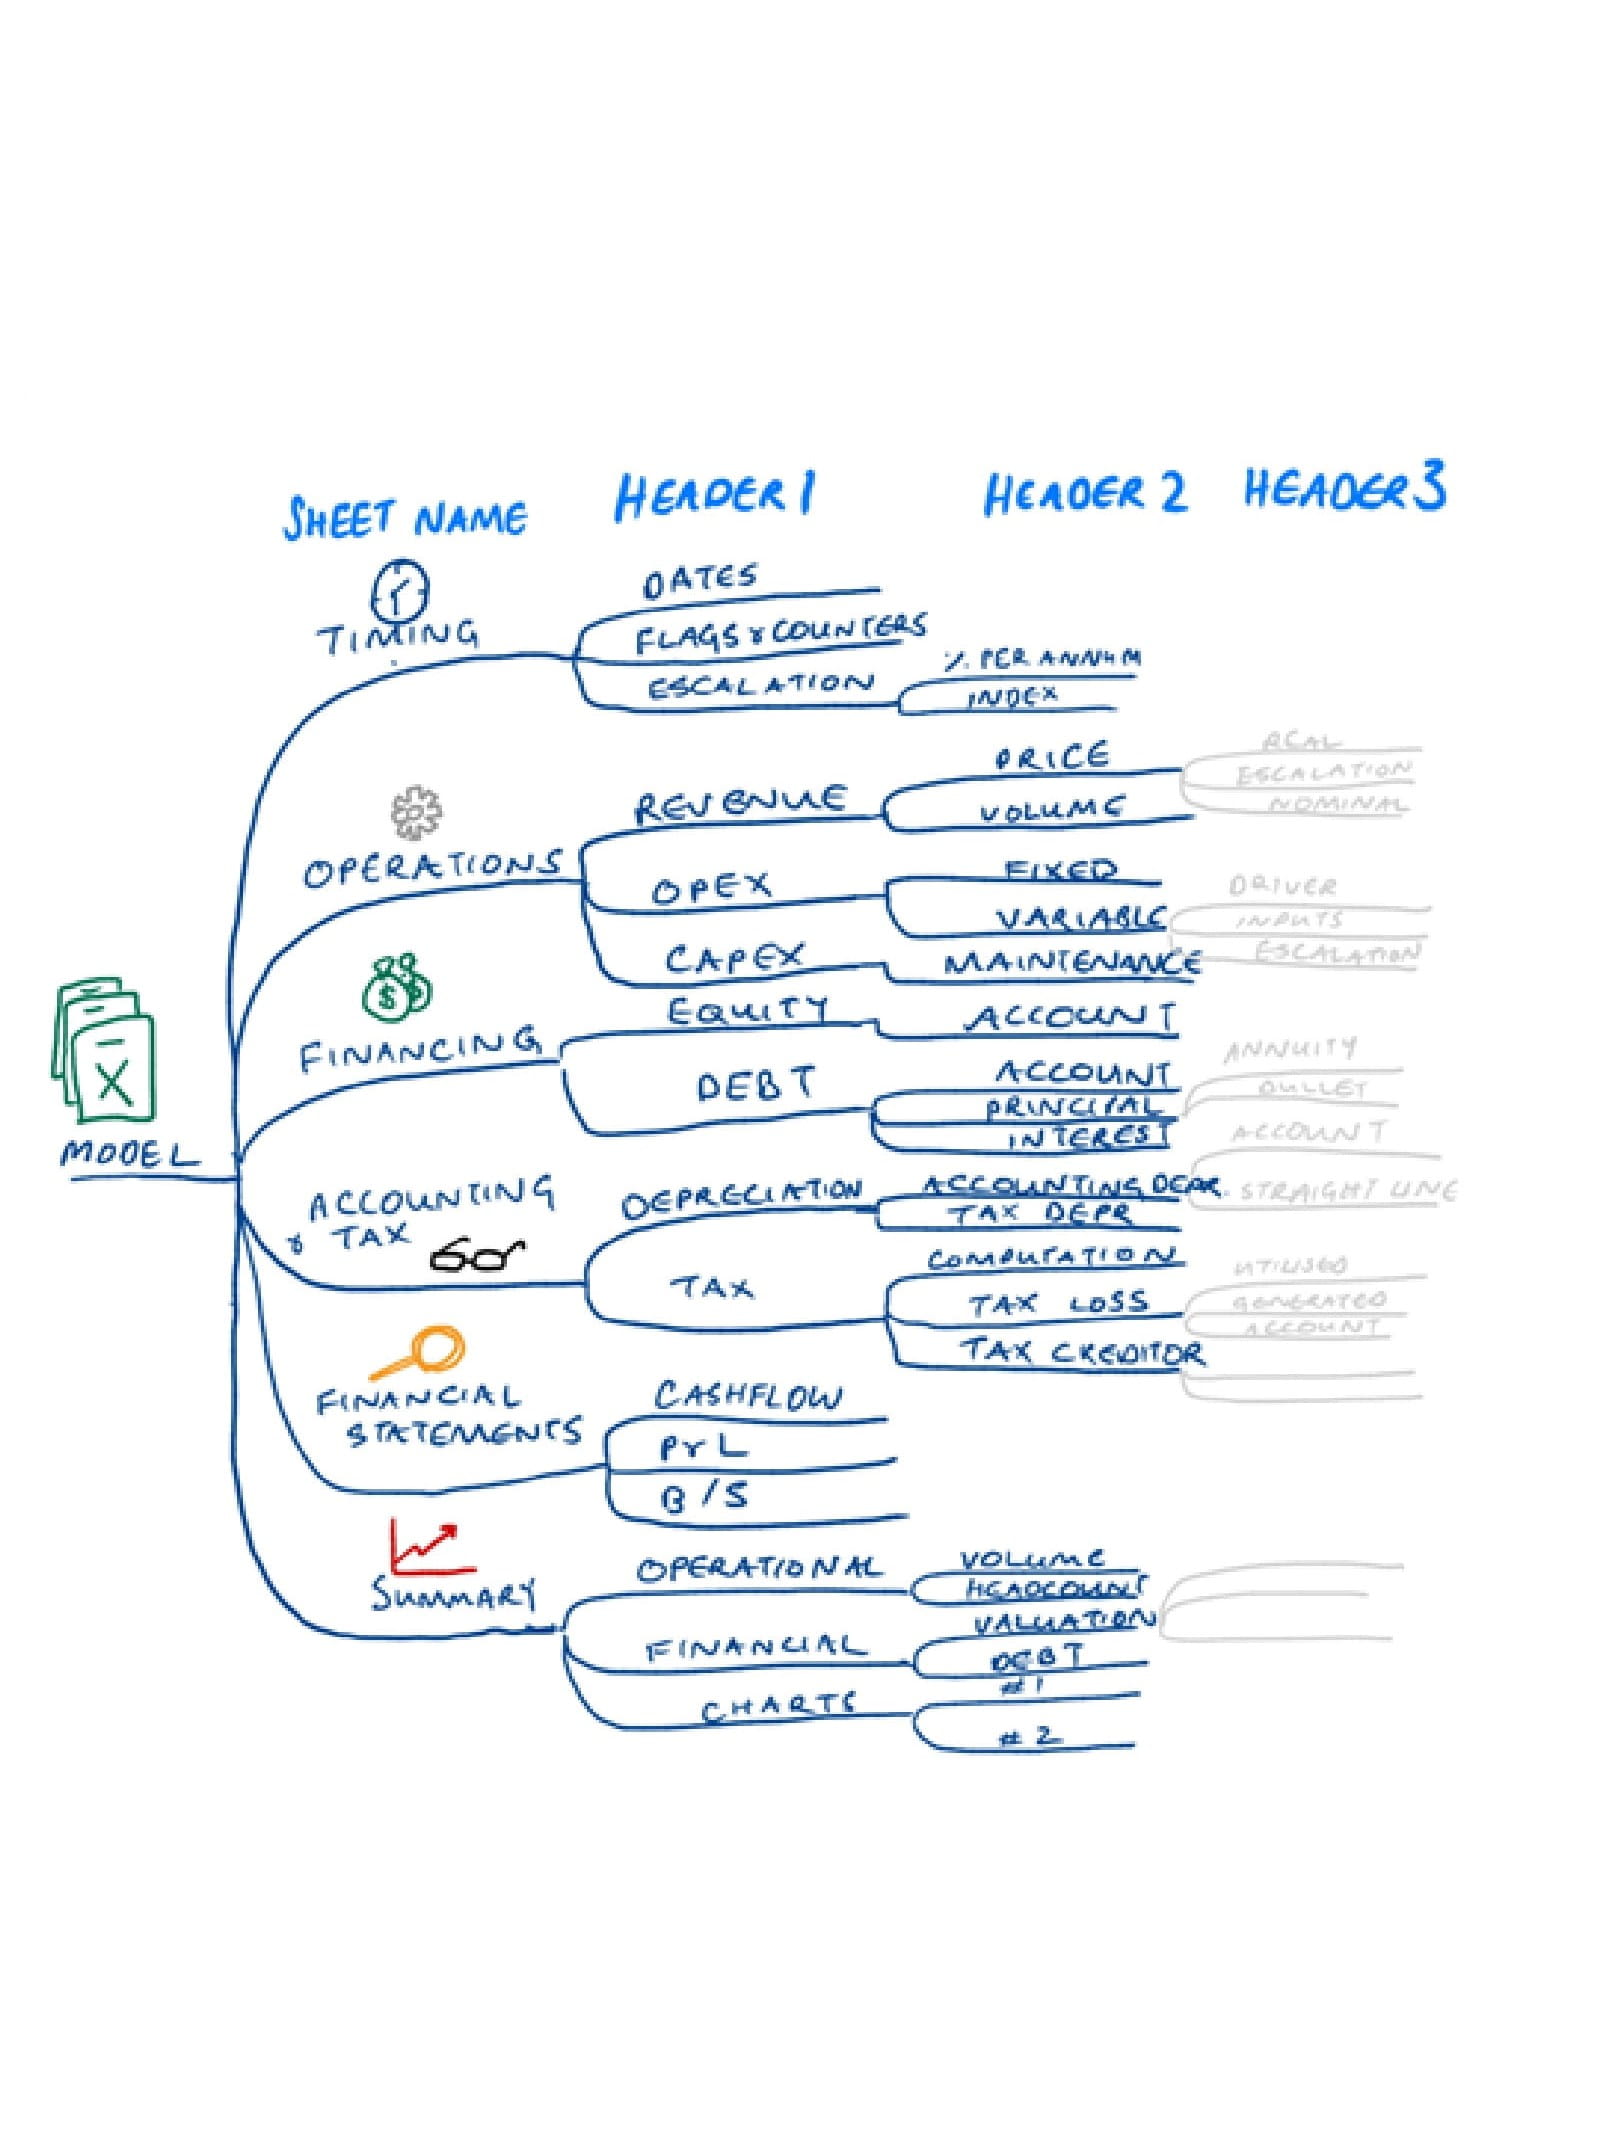
Hierarchy of the model
Going from workbook to worksheet to calculations: First things first, the structure and taxonomy of the model logic is critical and this can be one of the hardest items to get right. It requires an understanding of how the business model works, from the highest level, to the smallest detail. The diagram below illustrates an approach I have found to be a good place to start, because down to about the Header 2 level it describes a structure that can be used fairly reliably in describing a range of different businesses or assets (note the module diagram above is at the “sheet name level”).
The way I recommend building it up is to start with the outputs the model will produce, and then break down the constituent elements until you arrive at the level at which the inputs are presented. Each discrete level then translates into the heading structure - starting from the sheet name, down to header 3, and then to header 4 or calculations beyond this. This is not exhaustive, and the header 3 level has too many elements to neatly draw on this diagram, but it should give you a starting point. Not only will this help you structure the model but it should help structure your thinking.
The Timing Block
This is where the workbook-infrastructure feeds into the worksheet infrastructure: Some of the intermediate calculations developed on the Timing sheet should feed across to a section that is standard in each calculation sheet: The Timing Block [see labelled diagram below]. Typically repeated at the top of each worksheet, this should include:
- The start & end date
- Flags to indicate timing related characteristics (e.g. is the current time period one where actuals or forecast information is used; or does it fall in the construction or operations period)
Counters to help your call-up formulas connect to the inputs page (calendar years, Operations years etc) and ensure related calculations are performed in the correct periods. - Standardising the timing block in terms of features and location on each calculation sheet, will greatly assist model transparency. As a side note, flags (to be covered in a future blog series) are a workhorse in a financial model; they greatly reduce complexity and they increase transparency of any timing related calculation.
Worksheet layout
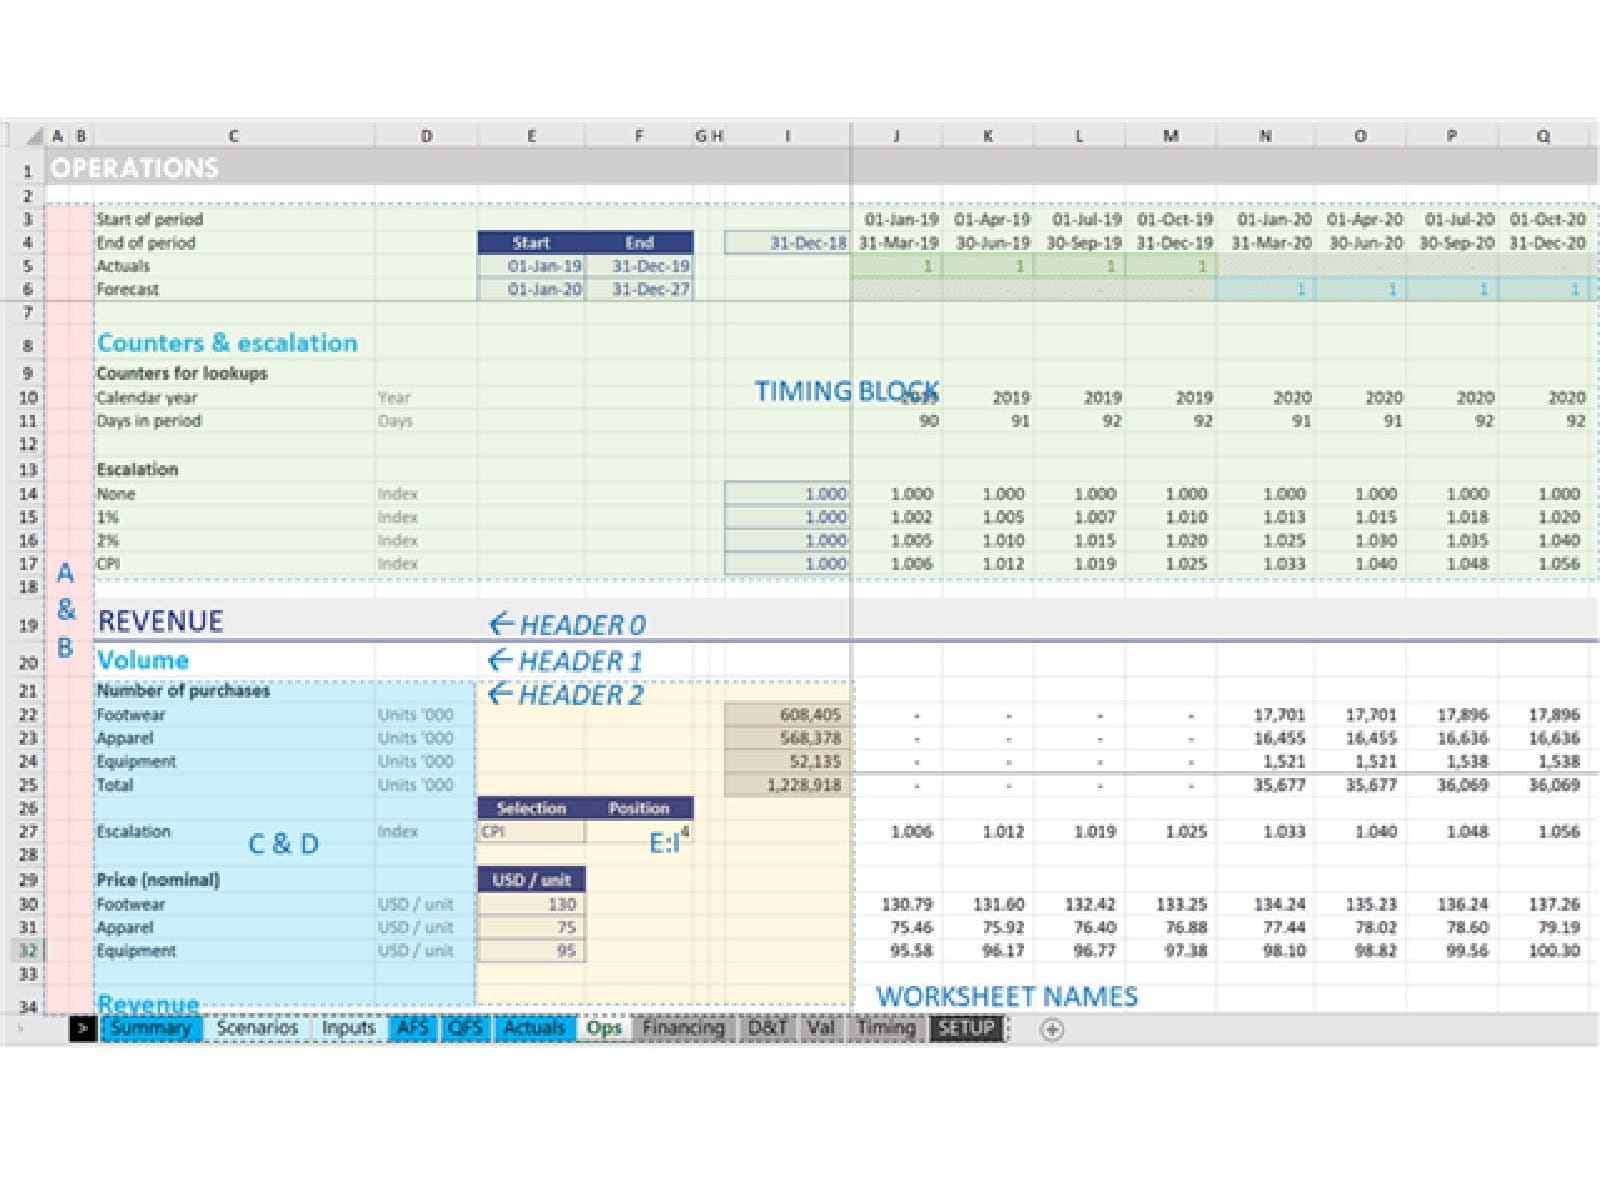
The following are suggestions for how you might structure a model:
- Col A:B One or two columns used as “framing” columns. This is helpful for:
- Indenting headings (not pictured above), to skip to the next section using Ctrl + Arrow Keys;
- Numbering items, e.g. “what category was that depreciation item supposed to go into again?”;
- A standardised place for communicating model issues or comments to the model developer, or to the end user (as opposed to commenting directly in the cell, which can get missed). Some modellers use these columns to capture error checks and flags.
- Col C:D Col C for labelling (which basically everyone does anyway), and column D for units (which unfortunately is often missed).
- Col E:I [columns before the timeline calculations]. I suggest reserving these columns for fixed input call-ups and intermediate or feeder calculations. These items are very useful in de-risking a model. Let's say you have a fixed price for the next 10 years. Instead of linking calculations directly to the inputs page, you might consider using cols E:I to link in the fixed price for display purposes. By being able to immediately see the constituent feeder elements of a calculation, a user is much more likely to be able to quickly understand the calculation. Additionally, some intermediate calculations may be required – for example if inputs are in sq ft (square feet), and your calculations need to be in sq m (square metres) - this area can be used to transform inputs into sq m, prior to doing it in the time-series calculation (columns J onwards in the above example).
Those are some of the big-ticket items for building a beautifully laid out model. If you’re building a small/medium sized model; these will all help you. If you’re building a large model, these are so fundamental, that you almost won’t be able to build or navigate a large model without them! There are other elements in the Financial Modelling Code’s guidance on layout, such as avoiding multiple-workbook models wherever possible, but that’s all we have time for now.
Next in series
Excel community
This article is brought to you by the Excel Community where you can find additional extended articles and webinar recordings on a variety of Excel related topics. In addition to live training events, Excel Community members have access to a full suite of online training modules from Excel with Business.

- Intro to Financial Modelling - Part 19: Wrap-up
- Intro to Financial Modelling - Part 18: Sensitivities and Scenarios
- Intro to Financial Modelling - Part 17: Calculation Techniques - Loan Calculations
- Intro to Financial Modelling - Part 16: Calculation Techniques - Flags and Masks
- Intro to Financial Modelling - Part 15: Error reduction - Common pitfalls
Archive and Knowledge Base
This archive of Excel Community content from the ION platform will allow you to read the content of the articles but the functionality on the pages is limited. The ION search box, tags and navigation buttons on the archived pages will not work. Pages will load more slowly than a live website. You may be able to follow links to other articles but if this does not work, please return to the archive search. You can also search our Knowledge Base for access to all articles, new and archived, organised by topic.
