
Welcome to the third and final part of this blog series on Excel’s Accessibility features where Andrew Paw explores best practices for creating and designing accessible spreadsheets.
As covered in part one of this blog series, Microsoft released Windows 11 in 2021, which is currently the most accessible version of Windows to date. Throughout this blog, I delve into the accessibility improvements introduced in Windows 11. However, it is important to note that screenshots provided as guidance on the effective utilisation of these features are taken from Windows 10.
Narrator
Narrator is a screen reading tool that allows users with visual impairments or difficulties to access on-screen content through audio. The narrator feature is found in both Windows 10 and 11. To provide a complete auditory representation, the Narrator can read text and other elements on the screen, such as buttons. This feature can also be used in conjunction with Excel, enabling users to have the contents of cells, formulas and other components within workbooks read aloud.
In the previous blog, I discussed a similar feature in Excel called Speak cells. Speak cells is a built-in feature within Excel itself, whereas Narrator operates at the system level. Speak cells allows users to select cells and have their contents read aloud without relying on the Narrator tool. The Speak cells built-in feature offers a more direct and immediate method to audibly access the content of selected cells. The main distinction between the two features lies in their scope, Narrator reads the entire screen content, including menus, buttons, and elements outside of Excel, while speak cells only reads content within selected cells. For more details on how to enable Speak cells in Excel, please refer to my previous blog.
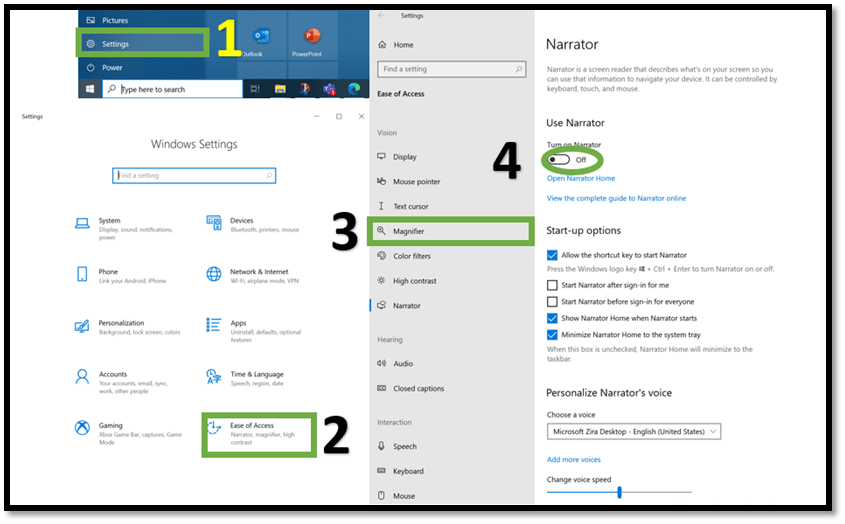
The image below, shows how to activate Narrator on a Windows 10 device. Additional methods for activating the tool using keyboard shortcuts include:
- To open Narrator settings: Windows Key, Ctrl, N
- To enable Narrator and to turn off the Narrator: Windows Key, Ctrl, Enter
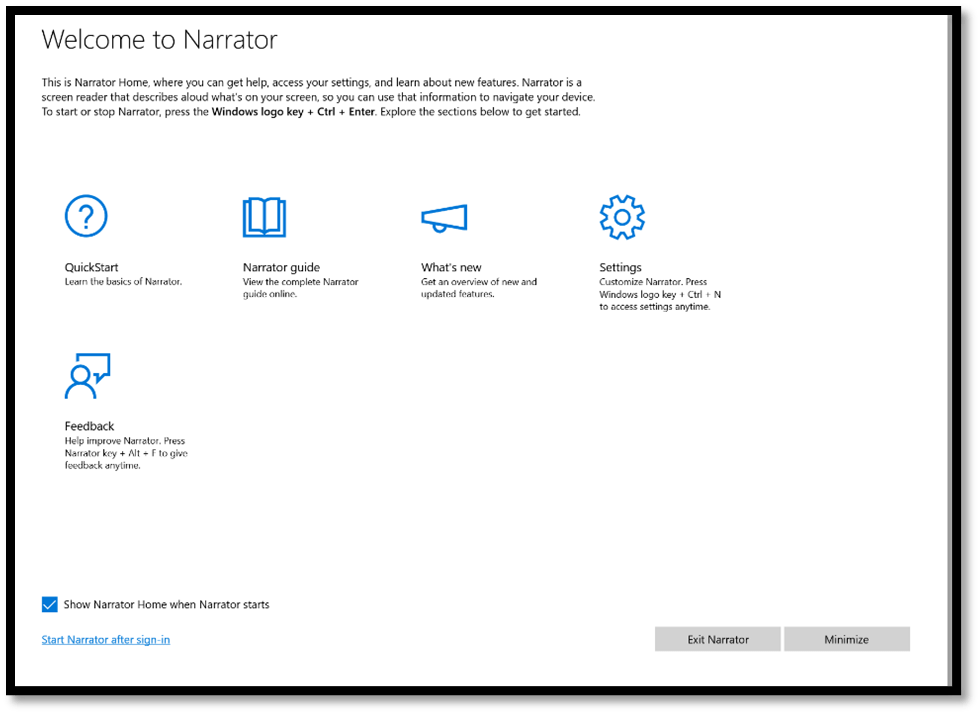
Once Narrator is activated, the Narrator Home window will appear (as shown in image below) which provides to user’s useful resources on how to effectively use the tool, access Narrator settings, and provide feedback for enhancing the tool’s performance.
An alternative way to access Narrator home is through the 1st link located below the “Turn on Narrator” button as shown in the image above.
How to change narrator voice or language?
The Narrator offers support for more than 35 languages, with various languages providing options for both male and female voices. For a comprehensive list of languages supported on Windows 10 and 11, you can refer to the following link: Appendix A: Supported languages and voices - Microsoft Support
To change language, go to Narrator, follow these steps:
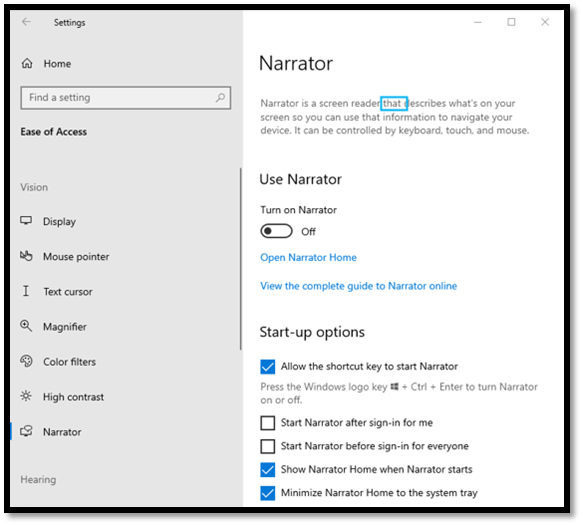
- Access the Narrator settings as shown in the annotated image above.
- Under the “Personalise Narrator’s voice” section, select “Add more voices”.
- You will be directed to the Speech settings page.
- From there, you can download any available voices.
- Once the voice has been downloaded, return to Narrator settings.
- Choose the downloaded voice from the available options.
How to customise narrator?
Users have several customisation options that can be configured within the Narrator settings; hence, I will break them down into different sections.
Note: To access Narrator settings, you can follow steps 1-3 outlined in the annotated image above.
Automatic Activation
Within settings, Narrator can be configured to automatically turn on either after sign-in or prior to sign-in, effectively eliminating the steps required to enable the feature. By simply clicking on the check boxes under the Narrator settings, individuals can seamlessly access the tool without any additional effort.
Voice Customisation
In addition to changing the voice of Narrator, which I have covered above, users have the ability to customise other aspects of the voice within the “Personalise Narrator’s voice” section in Narrator settings. Users can adjust the speed, pitch, and volume of the voice to suit their preferences. The Narrator can be modified to pause for punctuation, emphasise formatted text, and adjust the volume of background applications while the Narrator is in use. These options provide users with flexibility to fine-tune the Narrator’s voice characteristics and behaviour according to their needs.
Narrator Content
Within the Narrator settings, users have the ability to customise the content they hear when the feature is enabled. They can adjust whether they want to hear individual letters, numbers, and punctuation as they type or have the Narrator read whole words. Additionally, users can customise the Narrator to announce function keys, navigation keys like arrows or tabs, modifier keys and toggle keys such as Caps Lock and Num Lock when they are activated or deactivated. These customisation options allow users to adjust the level of detail and context provided by the Narrator.
Keyboard
In the keyboard settings section, users are presented with the option to select either a Standard or Legacy keyboard layout for Narrator. The Standard layout, which is the default setting, provides access to updated keyboard commands whereas the Legacy layout mimics the functioning of Narrator in earlier Windows versions. For more information on these layouts, please refer to Microsoft’s Support page. Additional settings include the ability to lock the Narrator key, eliminating the need to press it for each command, and the option to use a single press for the Narrator key.
Narrator cursor
The narrator is a visual representation of the current reading position of the narrator, indicated by a bright blue box on the screen as shown in the image below. By following the narrator cursor, users can track their position within a document or application and interact with various elements, including buttons, links, text and more.
Within the Narrator settings, users have the option to activate or deactivate the narrator cursor according to their personal preferences. They can also customise the narrator’s behaviour by choosing whether they want the system cursor to follow the narrator’s cursor, synchronise the narrator cursor with the system focus, and enable the narrator to read and interact using a mouse.
Braille Display
The Narrator feature includes support for Braille displays under the “Use braille” section within Narrator settings. By connecting to a Braille display, a narrator will convert text into Braille, enabling visually impaired users to navigate and interact with their devices more effectively. Users can download and install Braille through Narrator settings.
Speech Recognition
Windows 10 and 11, offer a built-in speech recognition feature that allows users to control their operating system using voice commands and dictation. This functionality enables users with difficulty of using a mouse and/or keyboard to better navigate their operating system.
Microsoft offers two types of speech recognition technologies: device-based and cloud-based. By enabling online speech recognition, users can teach their operating system to recognise their voice more accurately. By using the online speech recognition, Microsoft may collect and utilise voice recordings to create text transcriptions of spoken words. It is important to note that Microsoft does not “store”, “sample”, or “listen” to voice recordings without obtaining consent. For more information on how Microsoft protects the privacy of its users see How does Microsoft protect my privacy while improving its speech recognition technology?. In the image below, provides guidance on how to enable online speech recognition in Windows.
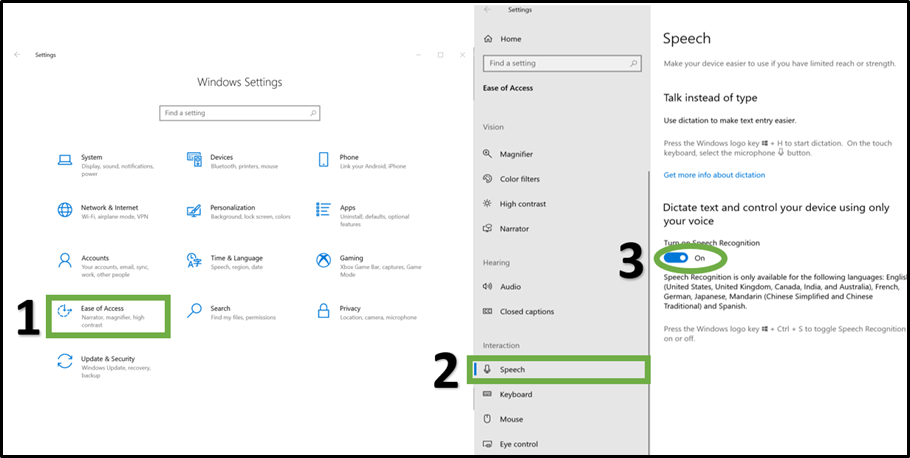
With device-based speech recognition, voice data remains within your device and is not transmitted to Microsoft. While device-based speech recognition might have less accurate recognition compared to cloud-based, features like Narrator will continue to work without collecting any voice data. The image below provides guidance on how to enable the speech recognition feature within Windows.
Voice Typing / Dictation
Voice typing uses speech recognition technologies to provide its speech-to-text transcription service. In Windows 10, this feature is known as dictation however, in Windows 11 the feature has been updated and renamed as voice typing. To enable voice typing better recognise your voice and provide more accurate results, users need to turn on the online speech recognition. Voice typing in Windows 11 supports more than 35 languages for a full list, refer to: Use voice typing to talk instead of type on your PC - Microsoft Support.
How to use voice typing/dictation?
Open an application in which you want to dictate text, such as Mail and press Windows Key, H.
Dictation with Microsoft 365
Microsoft 365 offers a built-in dictation tool feature that enables users to convert speech to text when creating documents, emails, notes, and presentations. This feature is only integrated into Word, OneNote, Outlook, and PowerPoint. Unfortunately, the tool is not available with Excel. If users wish to utilise speech-to-text capabilities in Excel, they can rely on the Voice typing tool, which is directly integrated into Windows 10 and 11.
Sticky Keys & Mouse keys
Sticky Keys, Toggle keys and filter keys
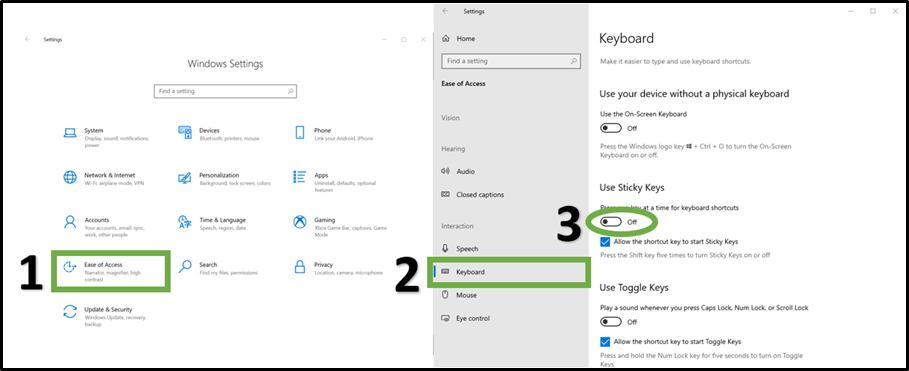
Sticky keys are an accessibility feature found in Windows that allows for modifier keys to stay active, even after they are pressed and released. Modifier keys are special keys on a computer keyboard, such as Alt, Ctrl, Shift, and the Windows key, which are used in combination with other keys to execute shortcuts. With sticky keys, users no longer need to press multiple modifier keys simultaneously, such as Ctrl, Shift, and Esc to open Task Manager. Instead, they can individually press these buttons to achieve the same outcome.
In my previous blog post, I covered keyboard shortcuts in more detail. Additionally, I will briefly touch upon toggle keys and filter keys, which are additional accessibility features for keyboards available in Windows.
How to enable or disable sticky keys?
Enabling or disabling sticky keys can be done through the settings on your Windows device, as shown in the image below. An alternative method to activate this feature using the keyboard is to press the Shift button five times, which opens a window to enable the feature.
As mentioned earlier, toggle keys and filter keys are additional accessibility features provided by Windows. Toggle keys are designed to alert users whenever they press the Caps Lock, Num Lock or Scroll Lock keys, effectively preventing unintended key presses. This feature ensures that users remain constantly aware of the status of these keys.
Filter keys allow the computer to ignore keystrokes that happen in rapid succession or are unintentionally held down for several seconds. This feature helps prevent unintended actions caused by accidental or prolonged key presses.
How to enable or disable toggle keys and filter keys?
To enable toggle keys and filter keys, follow the steps 1 and 2 illustrated in the image above. Then, scroll within the Keyboard settings section to locate the option for turning these features on or off.
Mouse keys
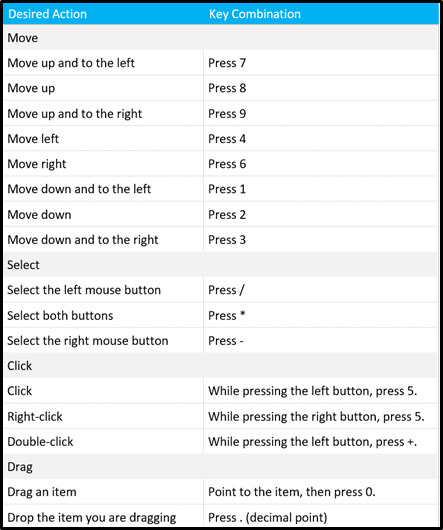
Mouse keys is another accessibility feature within Windows which enables users to control their mouse cursor movement using the numeric keypad on their keyboard. Mouse keys provide an alternative way to navigate and interact with the computer offering greater accessibility for individuals with motor impairments or other physical limitations.
When mouse keys are enabled, the numeric keypad’s keys are mapped to specific mouse movements and actions. For example, pressing the “9” key on the numeric keypad will move the mouse cursor up and to the right. See the image below for more examples on how the numeric keypad can be used instead of using a mouse.
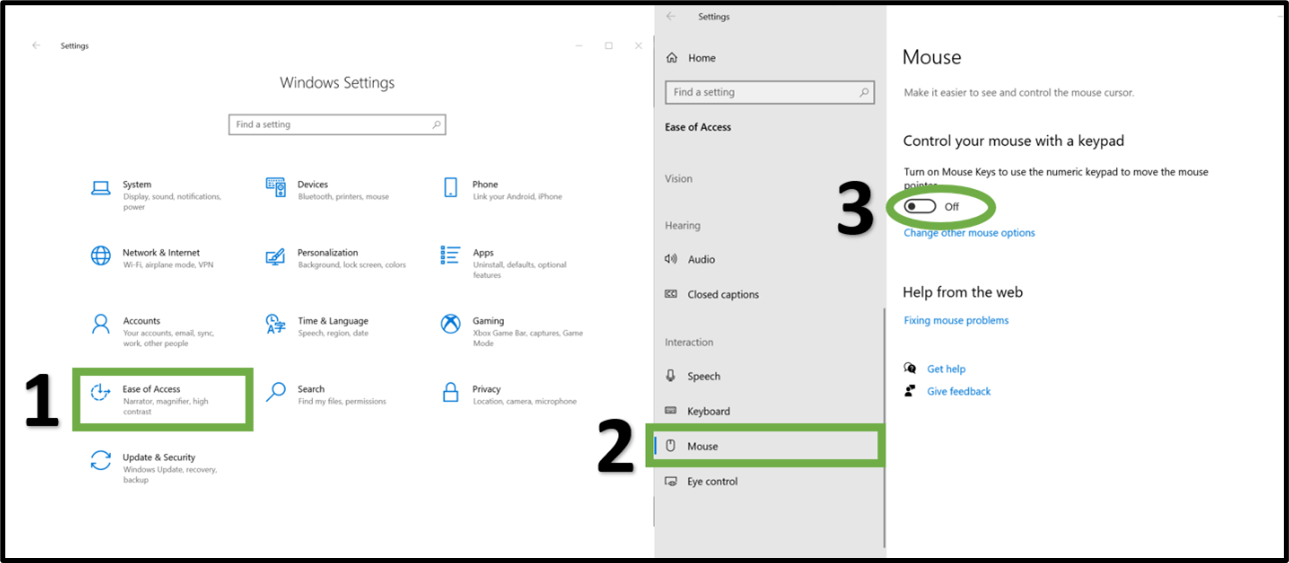
How to enable mouse keys?
The mouse keys feature can be activated or deactivated, through windows settings, as shown in the image below. An alternative way of activating the feature using a keyboard is by pressing Left Alt, Left Shift, Num Lock.
Can you use sticky keys and mouse keys in Excel?
The Sticky keys and Mouse keys features are integrated into the Windows operating system, and both features can be used in Excel. By leveraging these built-in accessibility features, individuals can experience more ease in navigating and working with Excel. These features are designed to improve accessibility, allowing a wider range of users to better interact with Excel spreadsheets.
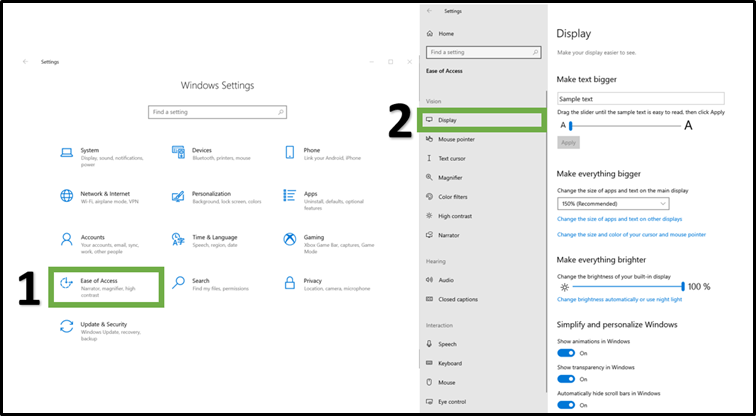
Visibility features - Text size, scroll bars, animations, mouse pointer visibility etc.
Within the Ease of Access settings (Accessibility settings for Windows 11), there are additional visibility features that users can leverage. Under display settings, users have the ability to adjust the size of text, ranging from 100% to 225%. They can also make everything bigger by modifying the size of applications and text, with the recommended setting being at 150%. Additionally, users have the ability to personalise their Windows experience by hiding animations, adjusting transparency, automatically hiding scroll bars, and showing or hiding the desktop background image. The image below, provides visual guidance on where users can find and adjust these features. Users can utilise these visibility features to better navigate and interact with their Excel spreadsheets.
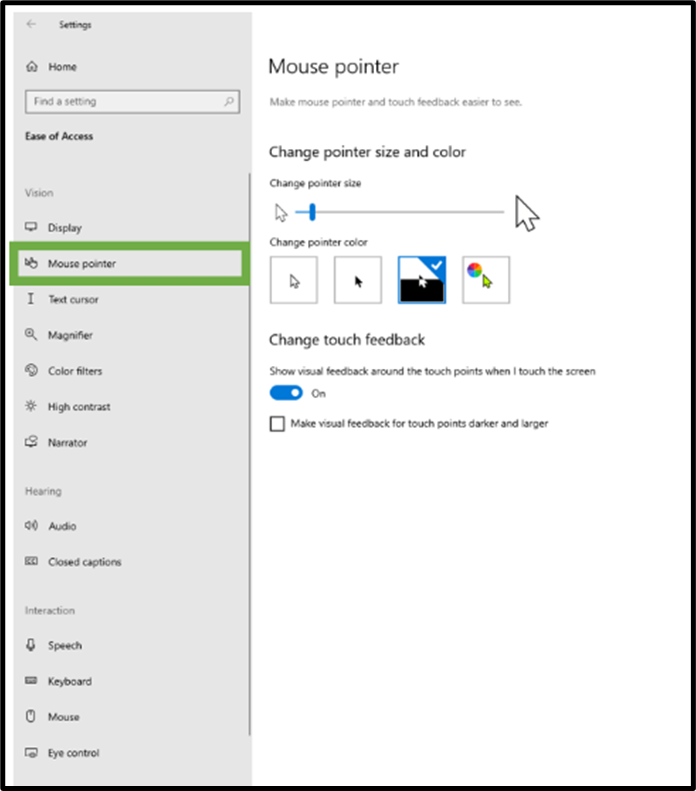
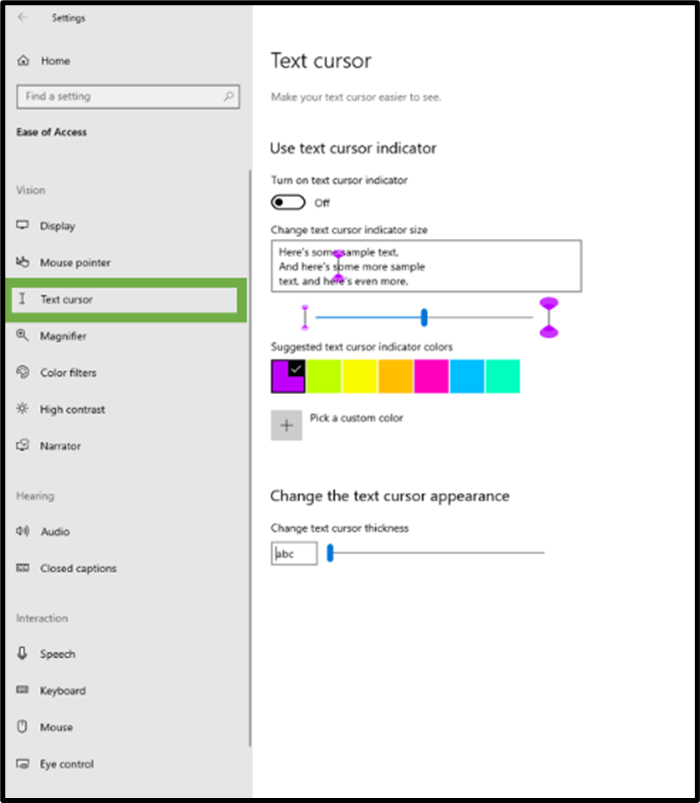
Users can also customise the appearance of their mouse and text cursor according to their visual preferences. They can enlarge or shrink the size of the mouse cursor and text cursor, invert their colours, or change their colours altogether. These settings can be found within the Mouse pointer and text cursor settings as shown in the images below.
To adjust the size of the mouse cursor, users can utilise the “size” slider and drag it to the desired level of enlargement or reduction. Additionally, for the text cursor, users can make it thicker if desired. Users can also modify the colour of their cursors while also having the flexibility to choose a custom colour.
To access these customisation features, users can refer to the image above and follow the first step. Then follow the images below to adjust the mouse cursor or to modify the text cursor. Any personalised cursor stings will also be reflected in Excel, allowing users to have a visually tailored experience within the application.
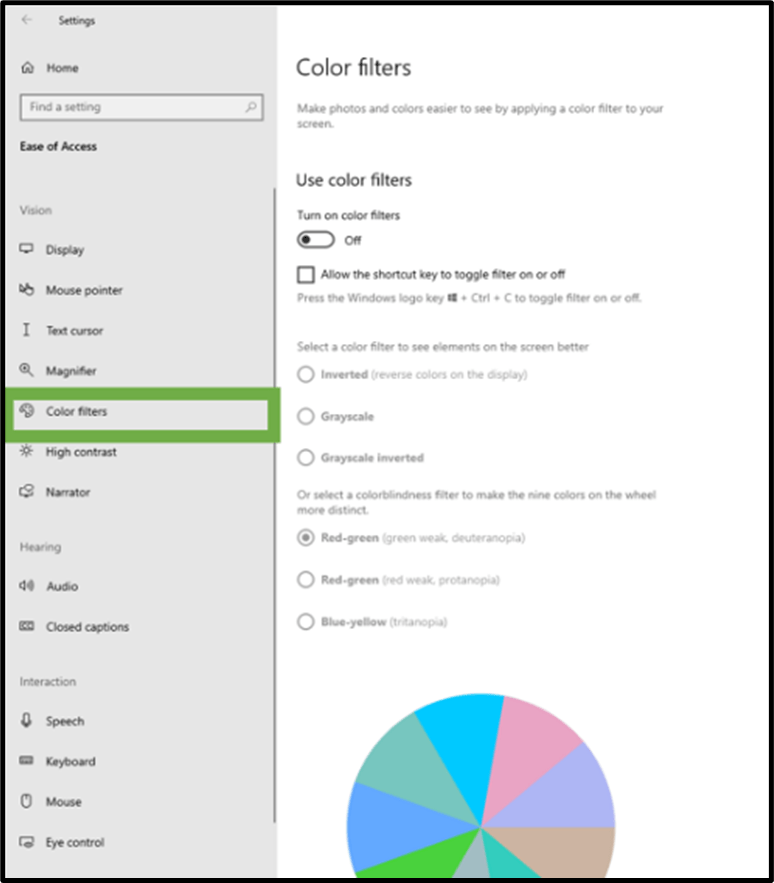
To enhance accessibility for users who are colourblind or colour deficient, Windows provides the option to apply filters that can make devices and apps more accommodating. Currently, there are six filter options available, allowing users to choose the one that best suits their specific needs. Selecting any of the filter options will automatically apply it to the computer system and extend their effects to Excel, ensuring consistent accessibility across applications.
To adjust colours, follow the first step mentioned in the images above to navigate to the Ease of Access settings. From there, proceed to the colour filters sections, as shown in the image below.
Eye Control
Eye Control is a functionality that became available to users with Windows 10, this feature enables individuals with limited mobility or motor impairments to control their mouse cursor, type using on-screen keyboard and communicate using text-to-speech. However, this feature relies on eye-tracking technology, which means that in order to use it, a compatible eye tracker is necessary.
Once the Eye Control feature is activated and they eye tracker is set up, users can navigate and interact with their computers by simply moving their eyes. However, it is important to note that the accuracy of the eye-tracking device can be affected by different factors, such as changes in lighting conditions. In such cases, the performance of the feature might not be as optimal, and Microsoft recommends recalibrating the eye tracker or restarting the tool to ensure more accurate functionality.
Windows 11, has built-in support for devices that let you control your computer with you eye movements, such as Tobii Eye Tracker 5. This eye control feature is accessible worldwide, but it is important to note that it currently supports the EN-US keyboard layout exclusively. Additionally, all settings related to eye control are currently available only in English.
For guidance on how to set up and use the eye control please refer to this link: Get started with eye control in Windows - Microsoft Support
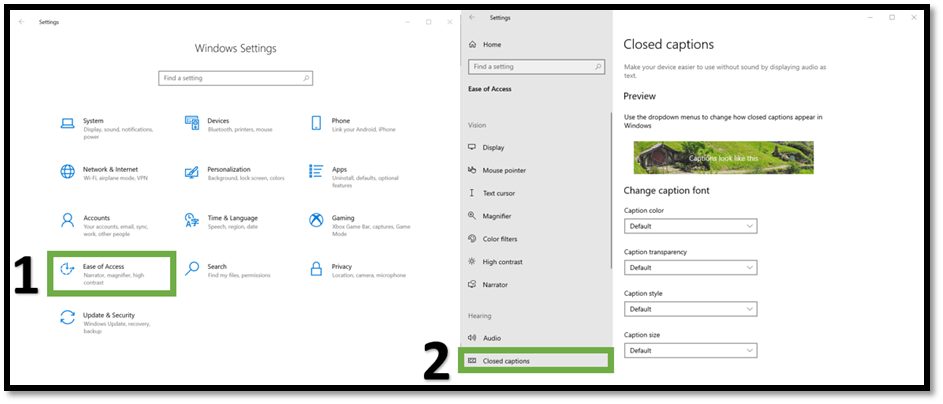
Closed Captions and live captions
Closed Captions
Closed captions is an accessibility tool in Windows that provides users with text that corresponds to the audio they are hearing. When enabled, captions are typically shown at the top or bottom of the screen. This feature allows individuals with hearing impairments and those who prefer reading text instead of relying solely on audio.
By default, closed captioning is available in Windows 10. To utilise it, please follow the below steps:
- Play a video and hover the cursor over the video, or right-click on the video to access the menu bar (as shown in the image below)
- Click on the cc icon, choose your preferred language and the closed captions will appear on the video. If closed captioning is not available for the video, a pop-up window will display the message “Not available”.

How to customise close captioning?
To customise closed captioning, access the closed captioning settings by following the guidance provided in the image below.
Within the closed captioning settings, users can customise various aspects of captions. This includes customising the caption font, (e.g., changing caption colour, transparency, style, etc.), adjusting the caption background (e.g., background colour and transparency), and modifying window content (e.g., window colour or transparency). By modifying these settings, users can adjust contrast based on their individual preferences and visual needs.
Live Captions
Windows 11 made available a new accessibility feature called Live captions, which offers real-time transcription of audio content into easily readable text. This feature provides live subtitles for audio and video files, benefiting individuals with hearing disabilities and those who prefer text over audio.
Live captions is similar to close captions, with users being able to customise the caption text, and position on the screen according to their visual preferences. One additional feature in live captions, is the ability to transcribe audio from a connected microphone, allowing users to have real-time captions. Currently, live captions support multiple languages, and is available to users even when disconnected from the internet.
To enable Live captions, you can follow these steps:
- Through Windows settings, then Accessibility, then Captions and turn on Live captions button
- To enable live captions through keyboard use: Windows Key, Ctrl, L
Focus Assist
Windows has introduced a feature called Focus Assist in Windows 10 and an updated version called Focus in Windows 11. These features are designed to minimise distractions and help users maintain better focus on their tasks. In Windows 11, the functionality previously known as Focus Assist has been replaced and is now referred to as “Do Not Disturb”.
In Windows 10, you can enable focus assist through Windows settings as shown in the image below.
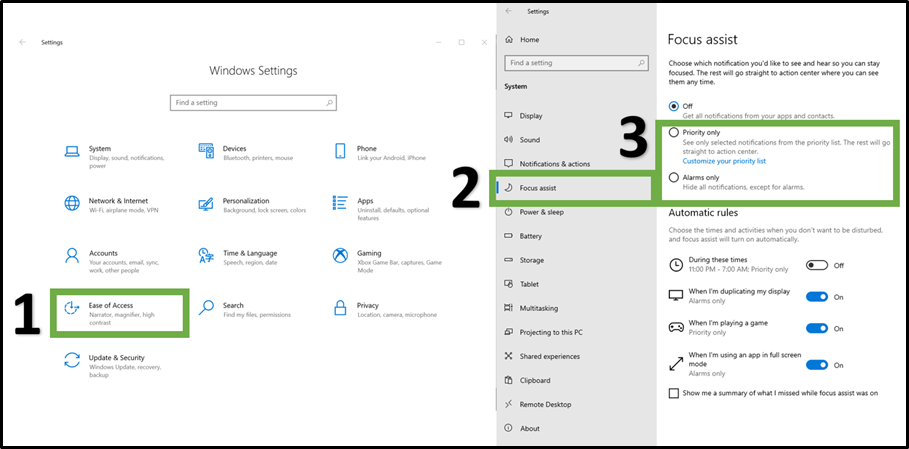
Within the Focus Assist feature, users have the ability to personalise their notification settings to suit their preferences. They can create a customised priority list, allowing them to receive notifications only from selected sources. Alternatively, users can choose to hide all notifications except for alarms, ensuring minimal distractions.
In addition to customising notifications, users can set up automatic rules to enable Focus Assist based on specific times or activities. This means users can define certain periods or activities during which Focus Assist will automatically activate.
In addition to the above, within Windows 11 Focus, users can add breaks to their session, add tasks, link their Spotify account, set daily goals, and adjust sounds.
How to make your Excel spreadsheet accessible
Below, I have included a few simple ways users can make their Excel spreadsheets more accessible. Making spreadsheets more accessible enables individuals with disabilities to better access and understand the information within the spreadsheets. Designing spreadsheets with accessibility in mind, tends to improve usability for all users.
Follow these simple steps to make your spreadsheets more accessible:
- Provide clear and descriptive names for cells and sheets. This makes it easier for users to understand the content within cells and allows screen readers and other assistive technologies to effectively navigate and comprehend the information. Use the Accessibility Checker to identify any blank sheets.
- Use formatting tools such as fonts, colours, and cell styles for sufficient contrast to make it easier to people to see and use the content. To detect any insufficient colour contrast, use the Accessibility Checker.
- Incorporating alternative text (alt text) to images and charts to provide a description of the content or purpose. When screen readers encounter alt text, they can read the description aloud, enabling visually impaired users to understand the information conveyed by the visuals.
- In cases, where your spreadsheet includes interactive elements or requires user input, provide clear instructions to guide users through the process.
- Use simple table structures and avoid the use split cells, merged cells or nested tables. Split cells, merged cells or nested tables can create challenges when using assistive technologies. To ensure accessibility, use the Accessibility Checker tool, to verify whether any split cells, merged cells or nested tables are present.
- Include text to cell A1, to ensure screen readers begin reading a worksheet correctly and help users with screen readers navigate through the content of the worksheet more easily.
- In cases, where your spreadsheet contains hyperlink text and Screen tips, provide readers accurate information about the destination target.
- Prior to finalising, use the Accessibility Checker to identify that any crucial accessibility elements are not missing.
Conclusion
In this blog, I covered the remaining features offered by Excel and Windows that can be used in conjunction to enhance accessibility. Additionally, this blog examines how these features can be customised to meet the users’ needs and provides guidance on how to enable them. Lastly, this blog concludes with a list of best practices, providing insights on how to create spreadsheets that are easily accessible to a wider range of users.
Please join me on Thursday 27th July for a Webinar on Excel Accessibility features and a walkthrough of what I have covered in the three articles. I will also talk about why it’s important to be aware of such functionality and how these fit into the world of business and the ICAEW’s Financial Modelling code.
Archive and Knowledge Base
This archive of Excel Community content from the ION platform will allow you to read the content of the articles but the functionality on the pages is limited. The ION search box, tags and navigation buttons on the archived pages will not work. Pages will load more slowly than a live website. You may be able to follow links to other articles but if this does not work, please return to the archive search. You can also search our Knowledge Base for access to all articles, new and archived, organised by topic.