
In this Creator level article, Mark Proctor returns to go beyond the basic Power Query interface and discover how to perform advanced transformations on existing columns.
When working with columns in Power Query there are two broad options – adding and transforming. They each have their own ribbon.
Add column

Transform

There are a lot of similarities between these two ribbons, such as working with text, numbers, and dates & times. Most of these options add or transform values in single columns.
If we want logic from multiple columns, we usually turn to a Custom Column which is available inside the Add Column ribbon. This feature allows us to write our own formula using any items that we can reference.
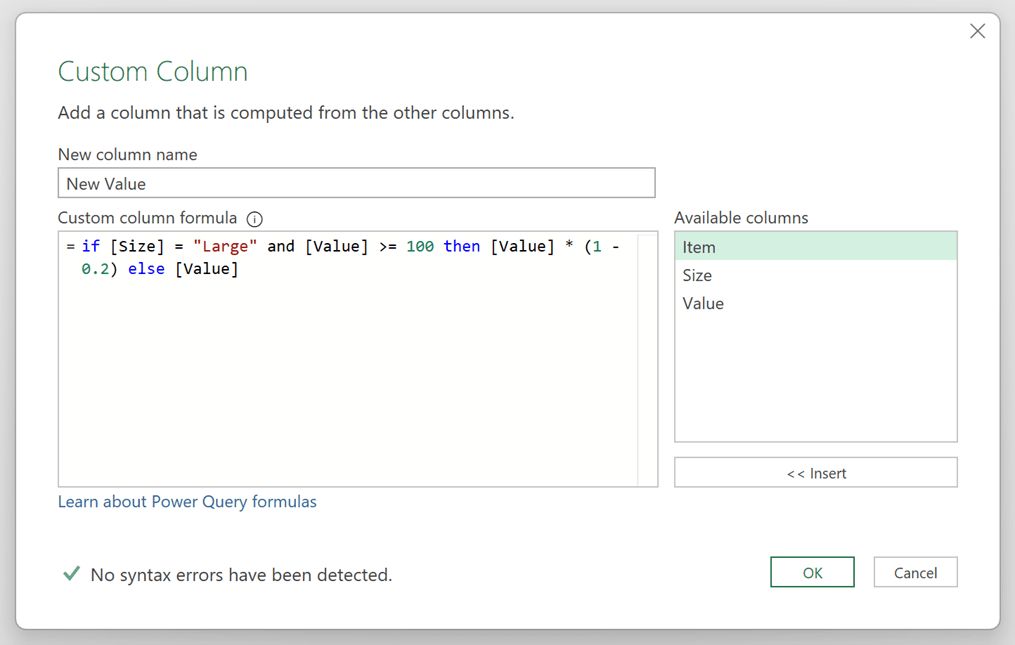
In the example above, we include a 20% discount if the Size is Large and the Value is greater than or equal to 100.
These formulas can handle complex scenarios, which makes the Custom Column feature very flexible.
However, we can only use this method to add a column. There is no equivalent for advanced transformations of existing columns with the user interface. This leads most users to implement the “Add Column Shuffle”. It goes like this:
- Add a column with the required calculation
- Delete the original column
- Rename the new column to have the same name as the original
- Move the columns into the same order as before
Instead of the one transformation step, we’ve relied on four separate steps. But with a little bit of knowledge, we can avoid the “Add Column Shuffle” entirely and transform any column in any way we wish. Just because the option doesn’t exist in the user interface, it doesn’t mean we can’t create it ourselves. That’s what we will do in the remainder of this post.
If you’re feeling confident, you could write all of this as M code from scratch. But if you’re like most Power Query users, the thought of writing M code is a step too far. Therefore, we will stick with what we know; using mostly user interface options, and making small tweaks where necessary.
Creating the logic
The first step is to create the row-by-row logic that calculates the value for each row in the column. Don’t worry, this isn’t as complex as it sounds. We’ve done this already.
If we use the Custom Column feature, we are already creating this logic.
Using the example above, the logic code is:
if [Size] = "Large" and [Value] >= 100 then [Value] * (1 - 0.2) else [Value]
All we have to do is select the code we entered and press Ctrl + C to copy. We will paste it in a few moments time.
We no longer need the Custom Column; we can delete this step.
Genereate the base code
We need a flexible Power Query function to transform an existing column. We will use the Table.ReplaceValue.
The function is constructed as follows:
Function Name: Table.ReplaceValue
Description: Replaces an old value with a new value in the specified column of the table
Syntax: Table.ReplaceValue (table, oldValue, newValue, replacer, columnsToSearch)
- table: The table to transform
- oldValue: The value to find
- newValue: The value to replace the oldValue with
- replacer: A special function that determines the type of replacement
- columnsToSearch: A list of columns to apply the find and replace to
A basic version of this function is available in the user interface. Select a column, then click Transform > Replace Values from the ribbon.
Depending on the data type of the column selected, there are two similar but slightly different views. It doesn’t matter which view we have.
We will enter dummy values for Value to Find and Replace With.
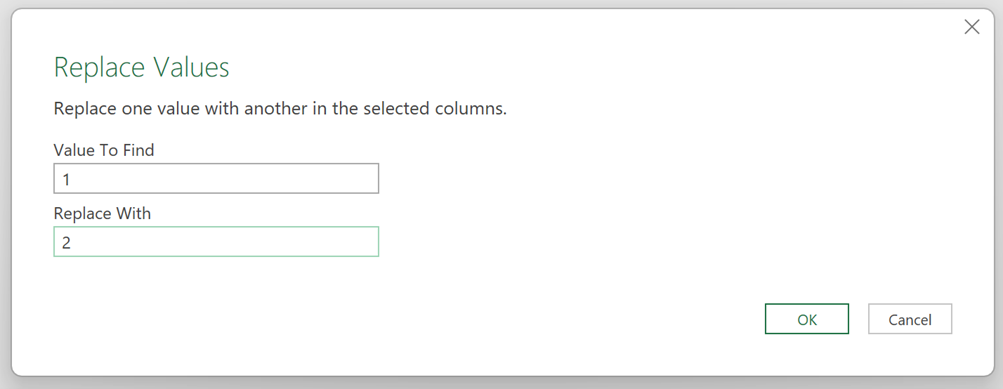
In our example, we transform a number. Therefore, we are going to enter 1 and 2.
If you are transforming text, you will need to enter text values. It ultimately doesn’t matter what we enter in here as they are dummy values.
When we click OK, we get the following code in the formula bar (or something similar).
= Table.ReplaceValue(
#"Changed Type",
1,
2,
Replacer.ReplaceValue,
{"Value"}
)
The line breaks are added for readability, but do not appear in the original code.
This is the Table.ReplaceValue function that we need. We just edit this to match our exact requirements.
Editing the generated code
Let’s edit the automatically generated Table.ReplaceValue code to get exactly the result we need.
table | #"Changed Type"
In our example example Changed Type is the name of the previous step. Your step name may be different, but you shouldn’t need to edit this part of the code.
oldValue | 1
We entered 1 as the value to find. This was a dummy value. Instead of searching for 1 in every row, we want to find the value of each row.
Change the code as follows:
Before:
= Table.ReplaceValue(
#"Changed Type",
1,
2,
Replacer.ReplaceValue,
{"Value"}
)
After:
= Table.ReplaceValue(
#"Changed Type",
each [Value],
2,
Replacer.ReplaceValue,
{"Value"}
)
This means Power Query will find each value in the Value column.
NOTE: The column name in the square brackets much match exactly with the column name we want to transform.
newValue | 2
We entered 2 as the dummy value to replace. We want to replace this with the logic we created earlier. Enter the key word each then press Ctrl + V paste the copied logic.
Let’s change the code as follows:
Before:
= Table.ReplaceValue(
#"Changed Type",
each [Value],
2,
Replacer.ReplaceValue,
{"Value"}
)
After:
= Table.ReplaceValue(
#"Changed Type",
each [Value],
each if [Size] = "Large" and [Value] >= 100 then
[Value] * (1 - 0.2) else [Value],
Replacer.ReplaceValue,
{"Value"}
)
This means Power Query will find each value in the Value column, and replace it with the result of the calculation.
Replacer | Replacer.ReplaceValue / Replacer.ReplaceText
Depending on the data type of the column we’re transforming the formula will include either Replacer.ReplaceValue or Replacer.ReplaceText.
We want to replace the entire value. Therefore, we need to ensure the code displays Replacer.ReplaceValue.
In our example, there is no change, but you may need to make the change for your scenario.
= Table.ReplaceValue(
#"Changed Type",
each [Value],
each if [Size] = "Large" and [Value] >= 100 then
[Value] * (1 - 0.2) else [Value],
Replacer.ReplaceValue,
{"Value"}
)
columnToSearch | {"Value"}
The last argument is the list of columns we wish to apply the transformation to. In our example we are transforming the Value column. This is the name we require between the double quotes.
Our code included the correct column name; we didn’t need to make any changes.
= Table.ReplaceValue(
#"Changed Type",
each [Value],
each if [Size] = "Large" and [Value] >= 100 then
[Value] * (1 - 0.2) else [Value],
Replacer.ReplaceValue,
{"Value"}
)
We’ve now made all the changes. When we commit the formula, it transforms the existing column using our calculation without resorting to the “Add Column Shuffle”.
Conclusion
Power Query doesn’t have an option in the ribbon to transform a column with advanced logic. However, by using other transformations and then tweaking the code, we can build the required transformation ourselves.
You never know, after you’ve done this a few times, you might decide M code isn’t too scary after all and you can have a go at writing it by yourself from scratch.
Archive and Knowledge Base
This archive of Excel Community content from the ION platform will allow you to read the content of the articles but the functionality on the pages is limited. The ION search box, tags and navigation buttons on the archived pages will not work. Pages will load more slowly than a live website. You may be able to follow links to other articles but if this does not work, please return to the archive search. You can also search our Knowledge Base for access to all articles, new and archived, organised by topic.
