
In this creator level post, we explore how to use the IMAGE function to insert pictures into worksheet cells using the file page of the picture.
The IMAGE function has been available in Excel for a few years now. It lets us pull images into cells with a formula.
However, the function only works with publicly available online images, and most of us don’t have websites on which to easily publish the images, so we have struggled to use it in real world use cases.
But there is a workaround which we will look at in this post. So, maybe you will finally be able to make use of the IMAGE function within your Excel workbooks.
Purpose and syntax
In the past, pictures floated on top of the grid, which made them difficult to work with. For example, it was easy to leave the images orphaned from the information they related to.
Excel now allows us to insert images into cells as values. We can also go one step further and get images based on file paths using the IMAGE function.
Syntax:
=IMAGE(source, [alt_text], [sizing], [height], [width])
The IMAGE function takes the following arguments:
- Source - The URL path, using an "https" protocol, of the image file.*
- Alt_text - Alternative text that describes the image for accessibility.
- Sizing - Specifies the image dimensions. The possible values are:
- 0 - Fit the image in the cell and maintain its aspect ratio.
- 1 - Fill the cell with the image and ignore its aspect ratio.
- 2 - Maintain the original image size, which may exceed the cell boundary.
- 3 - Customize the image size by using the height and width arguments.
- Height - The height of the image in pixels (if using a custom size)**
- Width - The width of the image in pixels (if using a custom size)**
* Supported file types are BMP, JPG/JPEG, GIF, TIFF, PNG, ICO, and WEBP.
** If only one of the arguments of height/width is specified, the aspect ratio of the image will be maintained according to the provided argument.
Basic Example
As a basic example, let’s suggest we go to the web page for the ICAEW Excel Community Articles.
We can scroll to the bottom of this page and find a list of the current authors. Right-click on the image of Ian Pay and select Copy image link.

Note: I’m using the Edge browser. Different browsers may have different options, but they are likely to have similar options.
We can now go to Excel, select cell A1, and enter =IMAGE(", then I will paste the link we copied, and close with ").
When we commit the function, it now displays the image as a value in the cell.
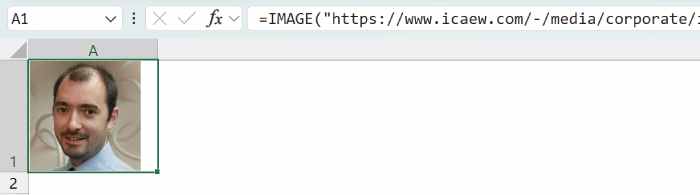
The image is generated by the function in cell A1.
=IMAGE("https://www.icaew.com/-/media/corporate/images/technical/
technology/excel-community/author-pictures/ian-pay.ashx?la=en&as=1&h=199&mw=200&w=200")
We could then play with the alt_text and sizing options depending on our needs.
Calculating with the IMAGE function
Now let’s see how we can take the IMAGE function a step further. Let’s see if we can change the image based on a data validation list.
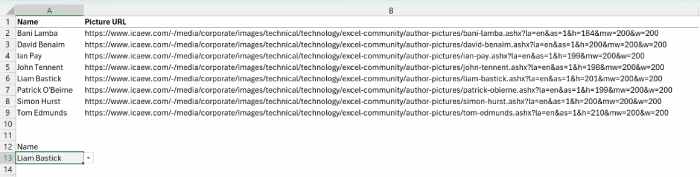
In cells A1:B9 are the names of the ICAEW Excel Community Authors and their picture URL.
In cell A13 is a data validation list with the names which can be selected.
So, now we can use a lookup function, such as XLOOKUP to get the URL and then pass the result into the IMAGE function.
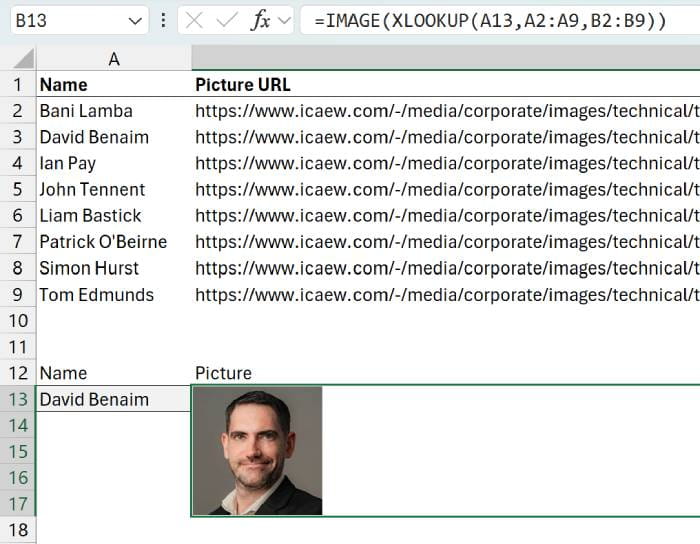
The formula in cell B13 is:
=IMAGE(XLOOKUP(A13,A2:A9,B2:B9))
Changing the name in cell A13 will now return a different image.
Note: To make the image a suitable size, I used Merge and Centre on cells from B13 to B17.
This all works great if the images are easily available on a public website, but what if they are not? There is a workaround for that.
Overcoming the image location problem
The IMAGE function only works with publicly available online images. So, this is an issue because very few of us have websites where we can easily publish images. However, most of us have access to OneDrive or SharePoint, and these are online locations where we can make the images publicly available.
If we have all the images saved in a folder on SharePoint, we can make all the images available.
Click the Share icon of the folder containing the images.
In the next window, click the gear icon to get the Link settings.
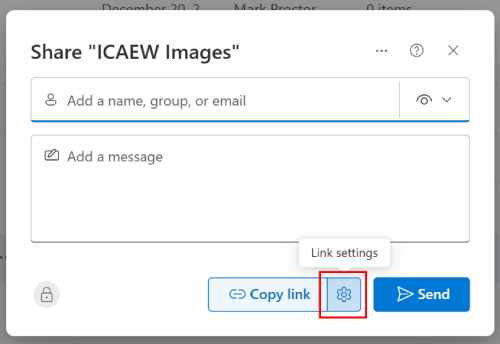
In the Link Settings window we select Anyone and then click Apply.
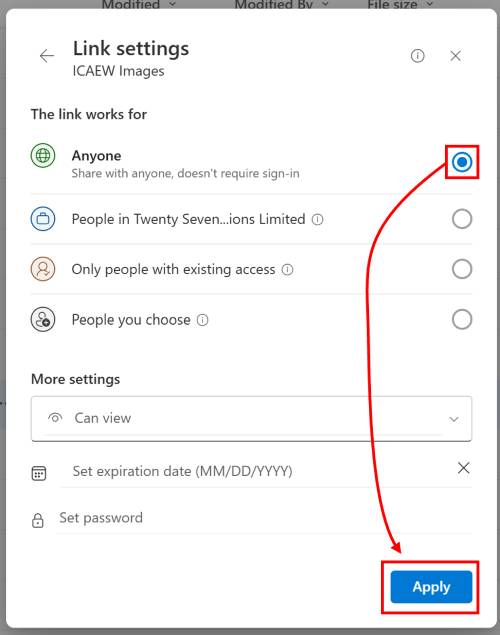
Note: If you don’t have the Anyone option, this setting is controlled by your SharePoint Admin, so you will need to ask them to turn on this option.
The images in the folder are now publicly available.
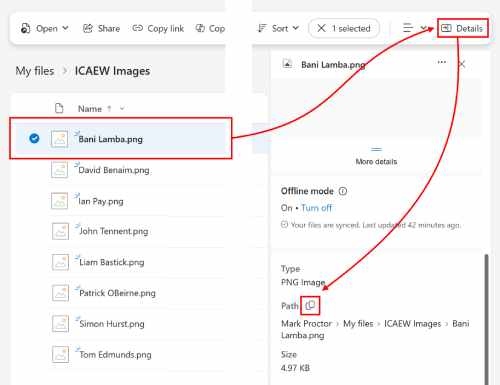
Now we just need to get the URLs for the images.
Next, let’s go into the folder, we can then select an image and click Details. Then in the pane on the right click the Copy direct link button for the Path.
Now we can go back to Excel and use the path in this format.
=IMAGE("[insert image url]?download=1")
The ?download=1 is important as it tells OneDrive / SharePoint to give access to the file instead of opening the file.
For this example, the full function would be:
=IMAGE("https://companyname-my.sharepoint.com/personal/mark_companyname_com/Documents/
ICAEW%20Images/Bani%20Lamba.png?download=1")
Because I know the Names and the corresponding file URLs, I can update my table.
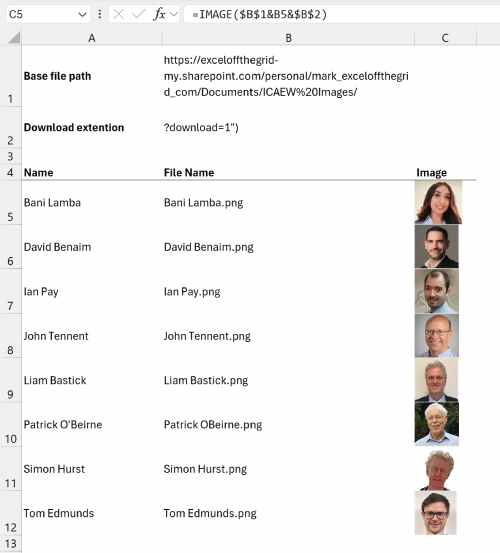
The formula in cell C5, which has been copied down in the cells C6:C12 is:
=IMAGE($B$1&B5&$B$2)
You will notice that for ease I have created a value for the base file path and the download extension.
So, now I’ve been able to use images for files saved on OneDrive within my Excel workbook.
It looks like everything is working, but it isn’t. Unfortunately, when we close and re-open the workbook, Excel displays #FIELD! for all the images.
But we’re not defeated quite yet. We can use formulas to retrieve the image if there is an error.
Change the formula in cell C5 to be:
=IFERROR(IMAGE($B$1&B5&$B$2),IMAGE($B$1&B5&$B$2)&T(NOW()))
Using IFERROR and &T(NOW()) is tricking Excel into retrieving the image if there is an error. So now, everything should be working correctly.
Note: In OneDrive, we shared the images with Anyone to make them publicly available. So, don’t use them for anything which would be considered as sensitive information.
Is this useful in the real-world?
The techniques used in this post were derived from a modelling project I’ve been working on.
The client calculates project costs based on pieces of equipment. All the equipment has reference numbers, but to make it easy for the client to know if they have selected the right equipment, they wanted to see an image.
So yes, there are a real-world use cases. And we can go further with fixed asset registers, dashboard indicators, product price lists, and more.
The key is that the images cannot be sensitive information. For my modelling project, they were pictures of equipment which the client did not consider sensitive.
Conclusion
Even though we are finance people who love numbers, images are a great option for providing additional context. By leveraging OneDrive / SharePoint as storage locations, we can easily make any images available to use with the IMAGE function.
Archive and Knowledge Base
This archive of Excel Community content from the ION platform will allow you to read the content of the articles but the functionality on the pages is limited. The ION search box, tags and navigation buttons on the archived pages will not work. Pages will load more slowly than a live website. You may be able to follow links to other articles but if this does not work, please return to the archive search. You can also search our Knowledge Base for access to all articles, new and archived, organised by topic.
