
Hello all and welcome back to the Excel Tip of the Week! This week, we have a Developer level post in which we are making a definitive review of how to install VBA macros and user-defined functions in your Excel – even if you don’t know any VBA yourself. This was last discussed back in TOTW #242.
Installing a macro
A macro is a program made in Visual Basic for Applications, or VBA – the programming language that Excel supports. Excel contains a recorder that can make these programs automatically, by recording a series of automatic steps that you carry out and then converting them into repeatable code, or you can write them from scratch in the VBA language. We have plenty of past TOTWs on learning to write your own VBA in the TOTW Index if you’re interested – but for today, we are just going to look at how to take code and add it to your version of Excel.
We’re going to start with macros. There is a dichotomy we have to think about that will also be relevant to user-defined functions when we get to them later – which is all about where we save the macro:
- Install in a file – We can save the macro in a .xlsm file, so that the macro and the file travel together. This means that anyone with the file can run the macro, but it can’t be used unless that specific file is open with macros enabled.
- Install locally – We can save the macro on our computer, so that it can be used in any file we open. But this will mean that it won’t be available to other users who we send our workbooks to.
Here’s a sample macro we will use in our examples:
Sub TableOfContents()
For Each ws In Worksheets
ActiveCell.Value = ws.Name
ActiveCell.Offset(1, 0).Activate
Next ws
End Sub
This is a macro that writes out a list of all the worksheets in the current workbook, starting at the current cell, for making a table of contents.
To install this in the current workbook, which again must be saved in the macro-enabled .xlsm format, we need to open up the VBA window – you can do this from the Developer tab (if you have it activated from Excel Options), or with the keyboard shortcut Alt F11. We then need to find our current workbook and right click to insert a module:
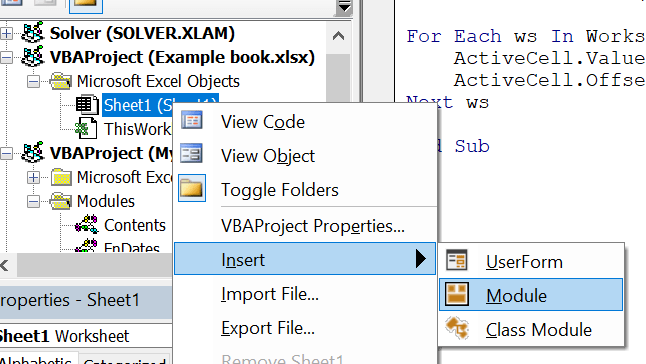
From here we can just copy and paste the code we want (or write our own if we’re feeling adventurous).
Note that some macros, which operate on specific sheets, might instead be added to the specific sheet object they work on, rather than in a module. However this is the exception rather than the rule, as putting generic macros in sheets is not good practice as they can easily be deleted by accident.
To install the code locally, the process is the same, except we need to add the macro to either an add-in (see below for more on those), or to the workbook PERSONAL.XLSB. This is an invisible workbook that opens automatically whenever Excel opens, and so can be used for containing code that you always want to have access to.
If you don’t already have a PERSONAL.XLSB workbook, you can record a simple dummy macro from Developer => Record macro, and choosing to save in your Personal Macro Workbook. Then open the dummy macro in the editor and overwrite it with your code.
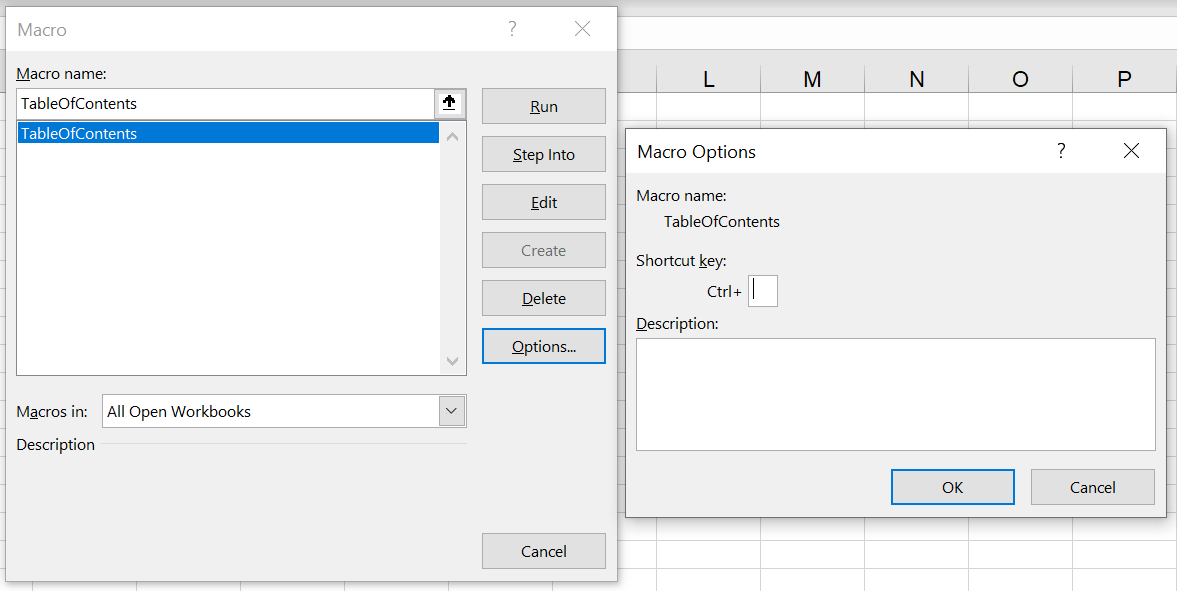
When you want to run a macro – wherever it is installed – you can either use Developer => Macros, assign the macro to a button Form control (see last week’s TOTW for more on those), or assign a keyboard shortcut, again from the Macros menu => Options:
Installing a user-defined function
Now we will look at how to install a UDF. Also written in VBA, instead of a series of steps to follow like a macro, a UDF creates a function, which can then be accessed like all the usual functions such as SUM, VLOOKUP, and so forth. Just like with macros, we can either install the macro in a specific .xlsm workbook, so that it is available for any user of that book, or install it locally so that we can use the function in any file we open.
For local installation, the process is essentially identical to a macro – we create a module in the workbook, and paste in the code. Here’s an example function which counts how many cells in a range are the same fill colour as a given example cell:
Public Function COUNTIFCOLOUR(SampleCell As Range, CountRange As Range) As Long
Dim cell As Range
Application.Volatile
For Each cell In CountRange
If cell.Interior.Color = SampleCell.Interior.Color Then
COUNTIFCOLOUR = COUNTIFCOLOUR + 1
Else
End If
Next cell
End Function
If instead of attaching this function to a specific workbook we want to be able to install this function on our device, so that it is accessible in all the workbooks we open on it, then we need to create an Excel add-in with it. To do this, create a new workbook, add the UDF code to it as usual, and then save it as an Excel Add-In:

Nicely enough, Windows automatically navigates to the add-ins folder when you select this file extension; if it doesn’t, you want something like:
C:\Users\YourUserName\AppData\Roaming\Microsoft\Addins.
Save the add-in, then go to Excel Options => Add-Ins => Manage:
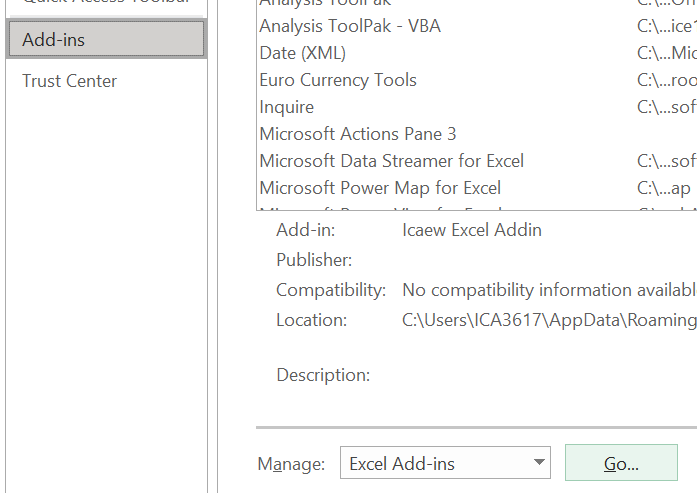
You can then browse to where the new add-in is saved. You may need to close and reopen Excel to get it to be recognised.
Whichever method you choose, to access your new UDF, you can just type its name just like any other function:

So next time you see some interesting-looking VBA code, now you know how to get it installed!
Join the Excel Community
Do you use Excel in your organisation? Are you using it to its maximum potential? Develop your skills and minimise spreadsheet risk with our Excel resources. Membership is open to everyone - non ICAEW members are also welcome to join.

Archive and Knowledge Base
This archive of Excel Community content from the ION platform will allow you to read the content of the articles but the functionality on the pages is limited. The ION search box, tags and navigation buttons on the archived pages will not work. Pages will load more slowly than a live website. You may be able to follow links to other articles but if this does not work, please return to the archive search. You can also search our Knowledge Base for access to all articles, new and archived, organised by topic.
