
When you merge two data sources in Power Query, such as two trial balances, you’ll often end up with unique values on each side – for example account codes and descriptions present in only one of the two files. But once merged you’ll typically want a single account code column and single account description column.
When new to Power Query, you might tend towards using conditional columns within the add column ribbon to create a new column using the logic if account code 1 is blank then account code 2 else account code 1. While this works it requires you to later delete the columns account code 1 and account code 2 and potentially reorder your columns to get back to the original layout.
An alterative is to replace blanks in one column with the contents of another column directly, which is easy to do with a bit of minor editing of the M code.
To do this go to Transform > Replace Values. Type in null in the top box to pick up the empty cells then put anything in the second box as a placeholder that we’ll edit shortly:
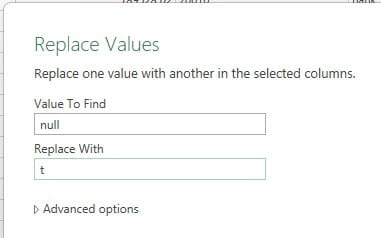
With the step saved, go to the formula bar and locate the placeholder value, in our case “t”. You can now replace “t” with “each [FieldName]”.

Adding “each” means the function will evaluate each line of the table separately so it pulls in the relevant row’s value from the column FieldName.
This solution is much neater, easier to follow and maintains the column order of the original table, meaning the process of tidying up the merge is straightforward, only now needing to delete the extra columns from the merged table

- A refreshed look at defining spreadsheet competency
- Excel Tips and Tricks #507 - Using Excel internationally part 1: why some functions are not good travellers
- Excel Tips and Tricks #506: Creating a single master list after merging data
- Excel Tips and Tricks #505 – 3 ways of converting US Dates into UK formats
- Excel Tips and Tricks #504 - Accessing accessibility checkers for good spreadsheet practice
Archive and Knowledge Base
This archive of Excel Community content from the ION platform will allow you to read the content of the articles but the functionality on the pages is limited. The ION search box, tags and navigation buttons on the archived pages will not work. Pages will load more slowly than a live website. You may be able to follow links to other articles but if this does not work, please return to the archive search. You can also search our Knowledge Base for access to all articles, new and archived, organised by topic.
