
Introduction
In part one of the series, we emphasised how much difference a suitable number format could make to the clarity and impact of a financial report, and we saw how we could create a very specific number format using the custom number format functionality. This time we will look at some different ways in which we can make our custom number format easy to apply.
Macros, scripts and styles
Creating a custom number format in a workbook only makes it available in the list of custom number formats for that workbook. Ideally, we would like our new format to be immediately available in all the workbooks that we create. One way of doing this would be to create a macro or office script by recording the application of your new custom format and then include a button to run the macro in a convenient place on the toolbar. A few months ago, David Benaim included instructions for this in one of his Excel speed up productivity tricks.
If you wish to avoid macros or scripts, then you can start by using an Excel cell style instead. Rather than needing to go to the Format Cells dialog, Number tab, to choose the new custom format which should be at the bottom of the list, we can easily attach our format to a Ribbon Tab button allowing it to be applied with a single click. The Number group of the Home Ribbon Tab includes a set of three buttons that apply Excel number styles: Currency, Percent and Comma. We’ll base our example on the Comma style. We just need to right-click on the Comma style in the Number Format section of the Excel Cell Styles gallery and choose Modify. We can then click on the Format button to choose our custom number format:
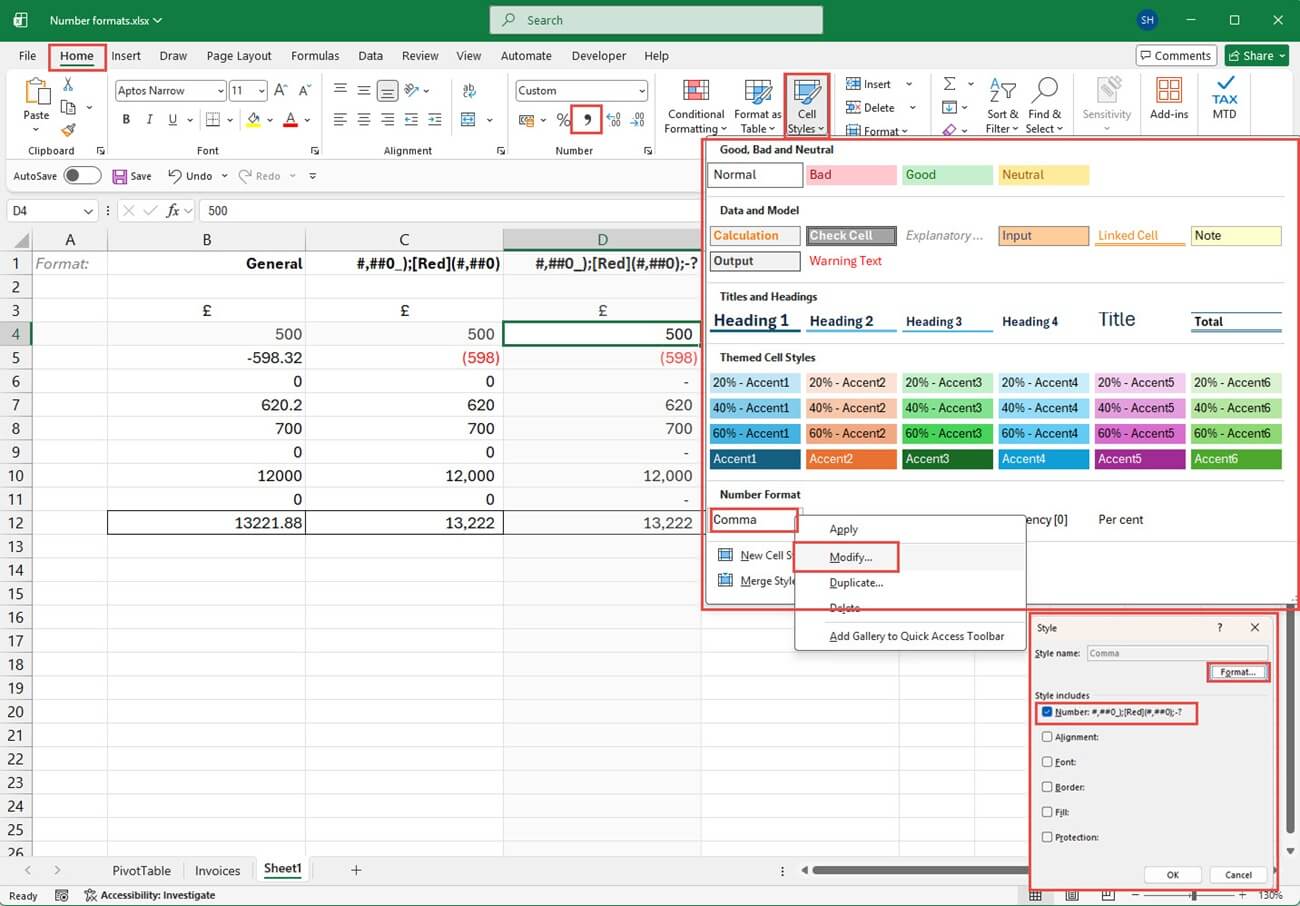
Once we have changed the number format of the Comma style, we just need to click on the Comma style button in the Number group to apply our custom format.
The importance of Excel templates
Unlike Word styles, which can automatically be added to the underlying template file, in Excel, cell styles just belong to the current workbook. The Merge Styles… command at the bottom of the Cell Styles gallery does allow you to import styles from another open Excel workbook, but our quest is to make the format automatically available in all new workbooks. To achieve this, we can modify the comma style in a workbook called Book.xltx in the Excel User StartUp folder. Go to File, Options, Trust Centre, Trust Centre Settings…, Trusted Locations to find the User StartUp folder location on your system. If a template called Book.xltx already exists in this folder, it will be used as the default for new workbooks. If you find an existing Book.xltx workbook then you could open it and merge your new comma style into it. If Book.xltx doesn’t exist, then you will need to create it. Perhaps the easiest way is to start with a new blank workbook and merge your style into that new workbook. You can then use File, Save As to save that new workbook as an Excel Template by choosing that option from the Save As Type box. You will then need to navigate to the User StartUp folder location described above, remembering to press Enter to select the new location as the save in folder, before setting the file name as Book.
Once a template named Book.xltx exists in Excel’s User StartUp folder it will be used as the ‘template’ for creating a new workbook when using the Control+N keyboard shortcut or the New button in the Quick Access Toolbar (but not when you choose File, New, Blank Workbook or first open Excel). Similarly, Sheet.xltx will be the default for a new sheet inserted into a workbook. You might find that you need to exit Excel and go back in before the new template works as intended.
Conclusion
We have now covered how to create exactly the number format that we require and how to apply it by clicking an existing Ribbon tab button. Next time we will investigate some of the more advanced features of custom number formats.
Additional resources
The Power BI based ICAEW Excel archive portal includes several detailed articles on number formatting. Select the ‘Formatting’ keyword to see a list:
Archive and Knowledge Base
This archive of Excel Community content from the ION platform will allow you to read the content of the articles but the functionality on the pages is limited. The ION search box, tags and navigation buttons on the archived pages will not work. Pages will load more slowly than a live website. You may be able to follow links to other articles but if this does not work, please return to the archive search. You can also search our Knowledge Base for access to all articles, new and archived, organised by topic.
