
What is a Power Query function?
You might not immediately think of functions when thinking about Power Query, which is better known as a data manipulation feature. And indeed that is what PQ is all about – easily and reliably transforming data according to a series of steps. Using the standard PQ tools you can step through changing your data in the way that you want, and then Excel can repeat those same steps later on to re-apply the changes as your input data changes. But a PQ function goes further – it lets you save a common series of steps separately from any particular data transformation task, so that you can then easily reuse those steps in any query you are creating.
Let’s take a look at this in practice by creating a simple function. We are going to make a function which discounts a price by 15%, and then rounds the result to the nearest 2 decimal places.
We start by creating a blank query in the PQ editor, either from right clicking the left-hand Queries pane or from Home:


The basic syntax element we see here is a let… in statement. This defines some variable or variables, which we then use to define whatever is shown at the “in” statement. We start by identifying the nature of the source – the input that our function will use – and what kind of data type it will be. In our case we have called this inputnumber and identified that it is a number. Then we start our let statement, listing our first temporary variable which we call newnumber, and defining that as being 85% of the inputnumber. We then have a comma, followed on a new line by our next variable roundednumber, which we define by using the Number.Round function on newnumber. As roundednumber is our final output, we can then just output this as the end result by putting roundednumber under the ‘in’ part of the function.
If properly written, the end query looks like this in the editor:
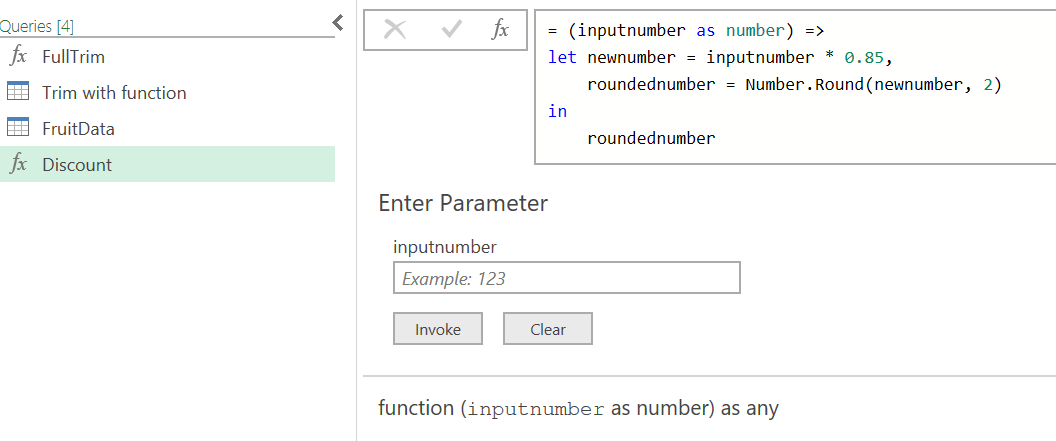
Note that the query is shown with an 'fx' marker indicating its nature. The query allows you to test it out by entering your own inputnumber and getting back a result before you use it.
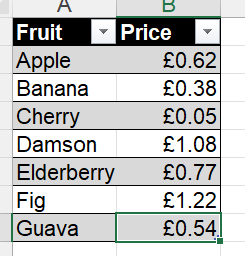
However, we are interested in applying our function to some actual data – specifically this fruit price data:
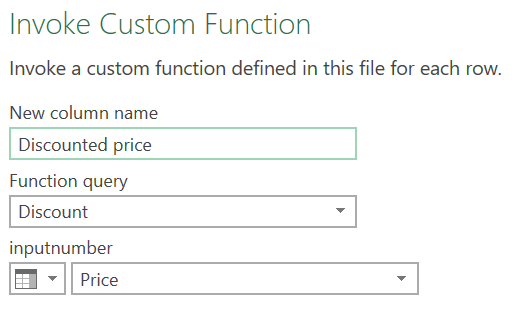
And that’s all! And with this function defined, we can now shortcut applying this particular set of steps in any query we make in this file.
Creating a more complex function
We are going to build on our initial example now with a slightly more complex function. In TOTW #436, we looked at how to remove excess spaces using a Power Query process. We can convert that series of steps into a single custom PQ function if we’re careful, allowing us to shortcut the process and reuse our trimming function easily.
Let’s take a look at the complete function:

Once again we have the basic layout of defining our input variable at the top (Here called mytext) before using a let/in structure to define a series of temporary variables. However, there are some key differences. The main one comes in the 'filter' step, where we see an underscore _ and the “each” keyword make an appearance.
To understand what these are doing, let’s review what the function does before that point. The ‘trim’ step just uses the default PQ Text.Trim function which, as a reminder, only removes starting and trailing spaces, and not excess interior spaces. This isn’t strictly necessary to make the function work but it doesn’t hurt. Then we define split, which uses the Text.Split function to break the text into multiple parts at each space character. This means our input text is now a list – aka a column – of each separate entry in the original, using spaces as delimiters. But if we have multiple interior spaces, some of the entries in that list are themselves going to be spaces – eg if we have 'a b' with three spaces in between, we end up with 'a', ' ', and 'b' as the three list elements. We don’t want that blank entry, so we need to use a filter (aka a List.Select function) to remove the blank entries from our list.
The difference comes because we are no longer applying a single operation to a single object; instead we need to apply the filter to each row in turn. And List.Select needs a function to go in that input, one that (row by row) computes either a true or false result, so that it knows whether to select that row or not. The way this works in M syntax is that we use ‘each’ to mark an operation that will happen for each item, and the dummy variable _ to stand in for whatever value we are getting from that row.
This can all be pretty tricky to get right. A big help is taking a look at the M code for a manually-created query that does what you want, and then adapting from there.
You can see both examples in action in the attached file.
Archive and Knowledge Base
This archive of Excel Community content from the ION platform will allow you to read the content of the articles but the functionality on the pages is limited. The ION search box, tags and navigation buttons on the archived pages will not work. Pages will load more slowly than a live website. You may be able to follow links to other articles but if this does not work, please return to the archive search. You can also search our Knowledge Base for access to all articles, new and archived, organised by topic.
