
Introduction
Apparently, it’s nearly Black Friday. I say apparently, because I haven’t yet seen any emails informing me of not-to-be-missed, limited-time, offers related to the first Friday after a day of transatlantic celebration. After briefly wondering whether the world had decided to give Black Friday a miss this year, I remembered that a few years ago I used Black Friday as an example of the benefits of setting up Outlook rules. When I checked my ‘Deleted items’ folder, there were the 70 Black Friday emails that my Outlook rule had protected me from.
Outlook rules
There are several options available to start creating an Outlook rule. You can right-click on an email that is a good example of the emails that you want to base your new rule on, and choose the Rules, Create Rule… option. Alternatively, you can find the Rules dropdown in the Move group of the Home Ribbon tab or the Manage Rules & Alerts button in the File screen. Although the right-click method can be a useful shortcut to creating a specific rule based on the content of the selected email, we will create a new rule from scratch, using the Rules Wizard, in order to cover all aspects of an Outlook rule.
There are three main components of a rule. Firstly, a condition, or set of conditions, that identify the emails to which the rule should apply; secondly the actions to carry out on emails that meet the conditions and thirdly, another set of conditions to identify any emails that should be excepted from the actions. Rules can apply to emails as they are received or as they are sent. Rules can be applied to new emails and can also be run on existing emails.
Conditions
Here, we have launched the Rules Wizard by going to the Home Ribbon tab, Move group, Rules dropdown and chosen Create Rule…
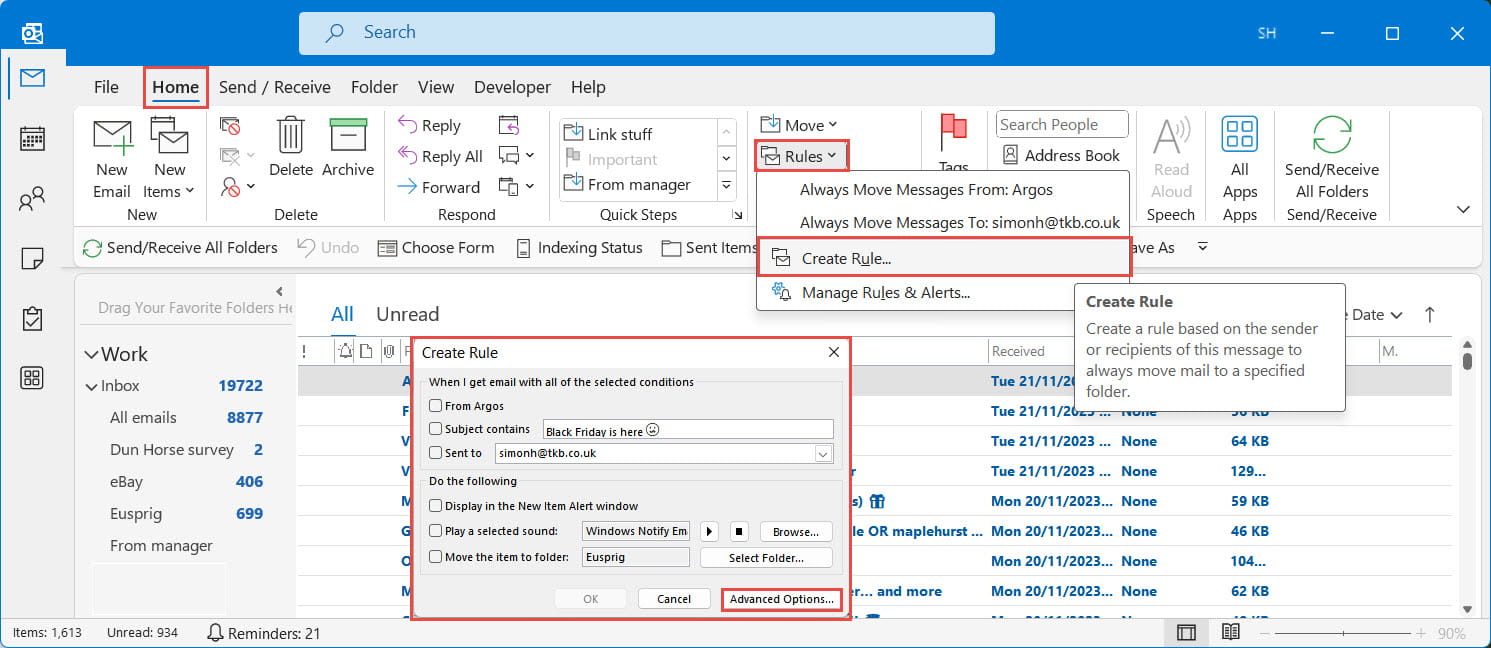
The Create Rule screen allows us to set up some conditions and actions quickly, based on the currently selected email, but we will click on the Advanced Options… button to launch the wizard and see the full range of conditions available. Here, we are looking at the condition set for our Black Friday rule. Note that you can scroll down to see even more conditions:
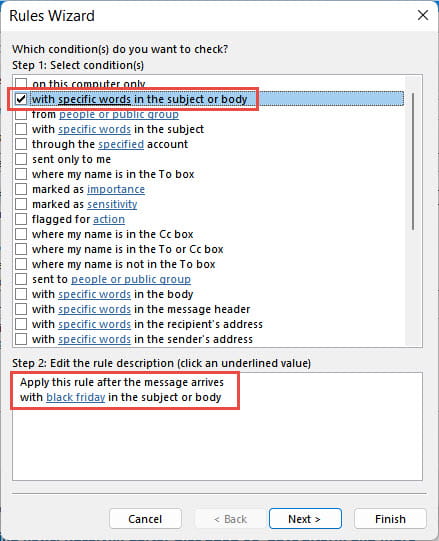
We have turned on the ‘With specific words in the subject or body’ condition. For many of the conditions, including this one, part of the condition text is shown as a link. You can click on this link to enter the required details. The rule will appear in the Step 2 box and a further link will open a dialog allowing you to enter the additional information required – in our case the phrase black Friday. Multiple conditions can be selected and each one will be added to the Step 2 box the conditions operate as ‘and’ conditions, so each one must be satisfied for an email to be selected.
Once we have set up the condition or conditions that we need, clicking on the Next button takes us to the Actions part of the wizard. Here we define what we want Outlook to do with our email. Again, for many of the options, we can click on the link to enter further details. In our case we just want to delete the email. Note that there is a choice between delete and permanently delete. Tempting as it might seem to go directly for permanently delete, it would generally be sensible to review emails that are caught by your rule, just in case an important email has been caught accidentally. Delete gives you that chance, unlike permanently delete:
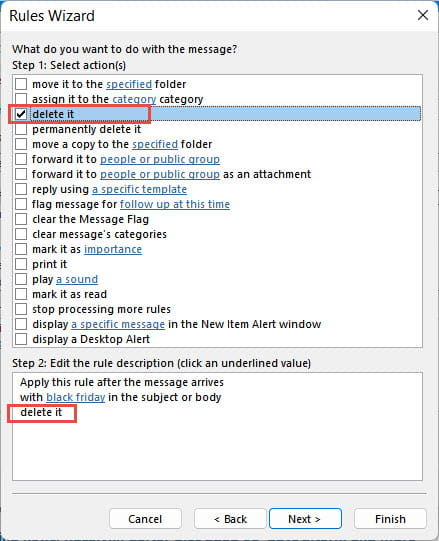
Multiple actions can be included and used to automate a whole chain of actions such as automatically moving the email to a particular folder and replying to it using an email template that you have previously set up.
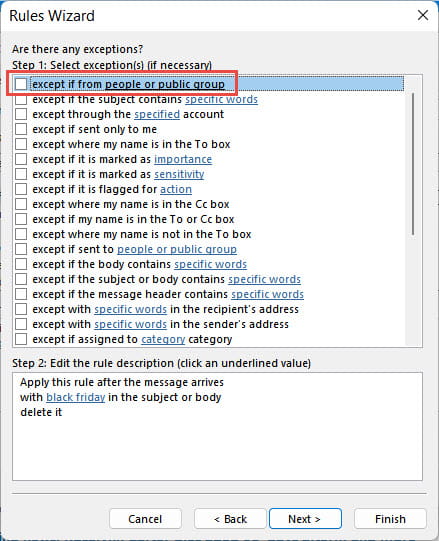
Once you have chosen and set up your actions, the Next button allows you to set exceptions to exclude emails from the rule. For example, you might never want to automatically process rules from certain colleagues:
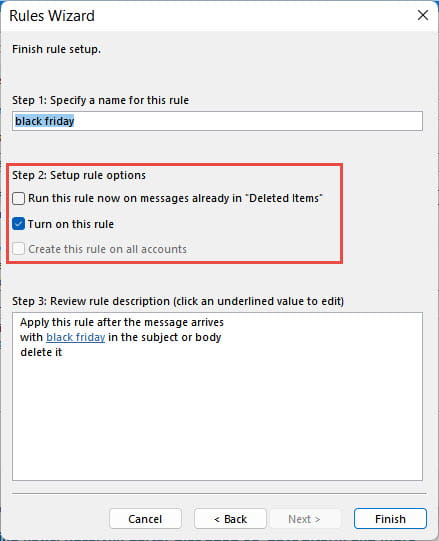
With the actions set, the Next button takes us to the screen that controls the implementation of the rule, allowing you to turn on the rule to process future emails and to run this rule on all the emails in the current folder:
Conclusion
Like any form of automation, it’s always important to check carefully that your rule works as intended and, particularly in this case, doesn’t have any unintended consequences such as deleting emails that you really need to deal with.
There are a few additional articles on Outlook in the ICAEW Excel Community article archive, including one from many years ago that applies to emails as they are sent, rather than received, and claims to be potentially career-saving:
Archive and Knowledge Base
This archive of Excel Community content from the ION platform will allow you to read the content of the articles but the functionality on the pages is limited. The ION search box, tags and navigation buttons on the archived pages will not work. Pages will load more slowly than a live website. You may be able to follow links to other articles but if this does not work, please return to the archive search. You can also search our Knowledge Base for access to all articles, new and archived, organised by topic.