
While M code in Power Query may look overwhelming and confusing, the functional language is similar to Excel formulas built using the LET function. In this article, Mark Proctor explores how to get started with understanding and using M code in Excel.
It was a pure fight or flight scenario. The amygdala in my brain was firing on all cylinders.
I stared at the meaningless text in Power Query’s advanced editor. Would I seek to understand this strange combination of characters, or would I click close as fast as I could?
I chose the second option. Click.
Those few seconds were more than enough confusion for any human.
Fast forward 6 years.
Power Query’s M code no longer holds that same power. It took years before I would finally try to understand the syntax. Once I did, I realized there is nothing to fear.
So, in this post, I want to give you the introduction to M code in Power Query that I wish I had. Once armed with this knowledge, you will be free to edit existing code, or even try writing your own code from scratch.
Where to find M code
When we click buttons in the Power Query interface, we see the Applied Steps box filling with the list of transformations.
In the background, Power Query is recording each of these steps in a language known as M.
We can see this code in three locations, the Formula Bar, the Custom Column dialog, and the Advanced Editor.
Let’s take a look at each.
Formula Bar
The formula bar is above the data preview, occupying a similar location to Excel’s standard formula bar.
Toggle the formula bar on/off by clicking View > Formular Bar from the ribbon.
As we click through the applied steps, the formula bar displays the code for the selected step.
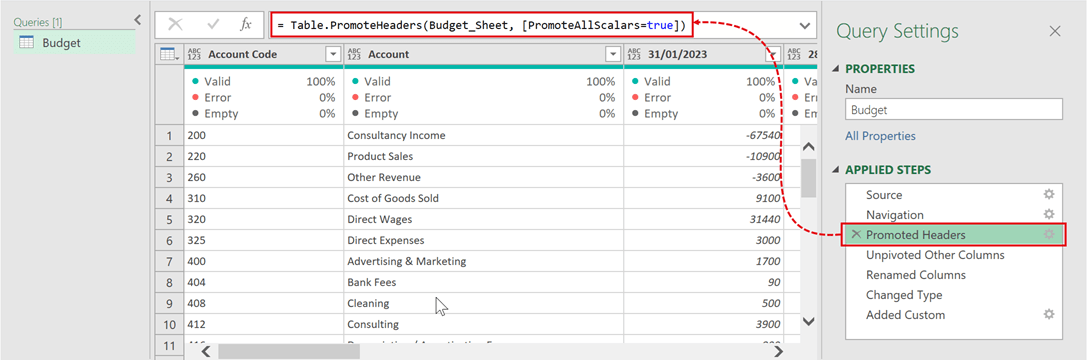
The screen shot above shows the code in the formula bar for the Promoted Headers step.
In the formula bar, we can edit this existing code, or even click the fx icon to add our own steps.
Custom Column
It is possible you have written M code without realizing it. Each time we add a Custom Column, the code we provide for the custom column formula window uses the M syntax.
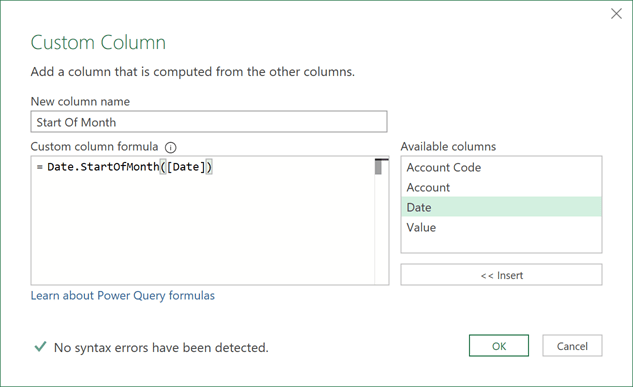
The code we provide here is wrapped in the Table.AddColumn function and incorporated into the M code.
After completing a custom column, we can see the code by looking at the formula bar for the step.

As highlighted, the code we provided is valid M code and forms part of the function.
Advanced Editor
The advanced editor contains the code for all the transformation steps.
To display the advanced editor, from the ribbon, click either Home > Advanced Editor or View > Advanced Editor.

Power Query Advanced Editor.png
The screenshot above shows the code for all the steps in a query.
In here, we can edit the existing code or even delete everything and start typing from scratch.
Notice the syntax checker at the bottom declaring “No syntax errors have been detected”. This does not check whether the code executes correctly, only that the syntax of the code can be read and understood.
Since the advanced editor contains the full code, let’s turn our attention there.
The “let” and “in” combination
Every query we create using the user interface contains two important words let and in.
- let is a keyword (highlighted in blue), it tells Power Query that a block of code is about to start.
- in is also a keyword, it tells Power Query to return the result directly after it.
So, how do we use let and in? Look at the following code:
let
a = 1,
b = 2
c = a + b
in
c
c follows the word in; therefore, c is the value returned. The value for c is determined by the preceding code starting at let.
The indentation means nothing, it is purely to make the code easier to read. Therefore, the code above could have been written as:
let a = 1, b = 2, c = a + b in c
Note: Pay close attention to where the commas exist. There is a comma between each statement, but there is no comma before the in. This is a common error which catches out many users.
It can be useful to think of the let and in combination in a similar way to Excel’s LET function.
=LET(
a,1,
b,2,
c,a+b,
c)
The LET function returns the value of c (the last argument), where the value for c is determined by the preceding arguments. This is similar to M code.
Initially, let and in might seem confusing, but they are just markers to indicate where the code starts and ends.
Variables
In the simple M code example used earlier, we had 3 variables: a, b, and c. We then allocated values to each variable. This is how all M code is generated by the user interface is structured.
Look at the screenshot above.
- Source is a variable which is allocated a result.
- Budget_Sheet is a variable which is allocated a result.
- #"Promoted Headers" is a variable which is allocated a result.
- #"Unpivot Other Columns" is a variable which is allocated a result.
- Etc, etc.
Each row of code is the same. It is a variable to which a result is allocated.
Where variable names contain spaces, Power Query adds additional characters, so it knows that it is a variable name.
Therefore, #"Promoted Headers" is merely a variable name which contains a space (unfortunately the double quotes and # symbol look quite confusing). If it had been called PromotedHeaders (without a space), it wouldn’t need those additional characters.
Functions and expressions
Excel formulas are a functional coding language. Due to constant exposure to Excel’s formulas, the names and syntax become familiar to us.
If we see the words VLOOKUP or SUMIFS, it doesn’t fill us with dread.
M is also functional coding language. The formulas have names such as Table.PromoteHeaders, or Table.UnpivotOtherColumns.
Just like Excel, M functions start and end with brackets, and contain commas to separate each function argument.
Take a look at the following M code. It contains the Text.Start function to extract the first 5 letters of a word.
let
Word = "ICAEW Excel Community",
Letters = Text.Start(Word, 5)
in
Letters
The M code above returns “ICAEW”
The LEFT function in Excel does exactly the same thing. The same function in Excel would be:
=LET(
Word,"ICAEW Excel Community",
Letters,LEFT(Word,5),
Letters)
Excel performs calculations on the grid involving text, numbers, logicals (e.g. TRUE/FALSE), errors and arrays.
Power Query is different. It is primarily for shaping and transforming data rather than calculations. Therefore, along with text, numbers, logicals and errors, Power Query also handles tables, lists and records. To do this, it includes functions which would serve no purpose in Excel.
For example, the Table.PromoteHeaders function has no purpose in Excel, but it is important in Power Query.
It is likely the Power Query M function names appear confusing to you. But it is also likely you have not had daily exposure to the functions. Therefore, just like Excel, where you built up your skill and knowledge over time, the same is true of M code.
Code flow
When using the user interface to make transformations, the applied steps occur in order.
The recorded M code matches the order of the applied steps.

Look at the screenshot above. Notice how the variable names match the applied step names, and are in the same order.
The exception is the Navigation step. This is a special case, outside the scope of this post. Just be aware that a step called Navigation may have a different name in the Advanced Editor.
Each transformation we undertake, is building on the previous transformations.
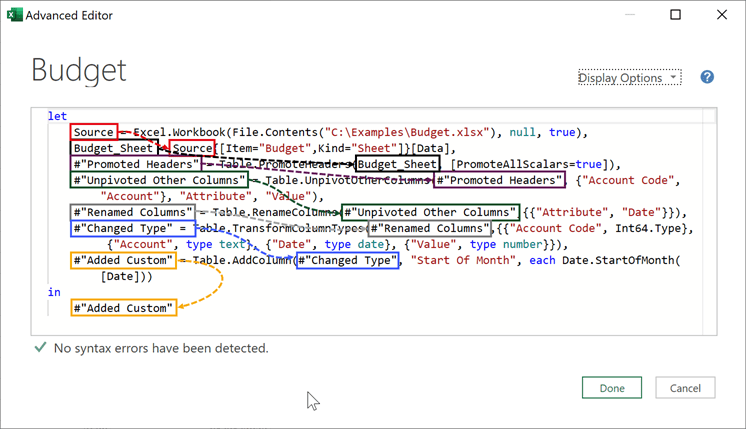
Look at the screenshot above. Notice how each variable is used in the following step.
- Source is the first variable. Its result is derived based on the Excel.Workbook function.
- Budget_Sheet is the second variable. It uses the result from the Source step.
- #"Promoted Headers" is the third variable. It uses the result from the Budget_Sheet step within the Table.PromotedHeaders function.
- #"Unpivoted Other Columns" is the fourth variable. It uses the result form the #"Promoted Headers" step in the Table.UnpivotOtherColumns function.
- Etc, etc.
Every step refers to the result of the previous step. Through this we can easily see how the applied steps flow through the code.
Conclusion
That brings us to the end of our short introduction to Power Query M code.
Hopefully, you’ve seen that in its basic form, the M language is nothing more than variables and functions, wrapped within the “let” and “in” key words.
The construct is similar to Excel formulas built using the LET function.
While M code might look confusing and overwhelming. Think back to the first time you saw VLOOKUP; you were confused and overwhelmed then also. Through constant exposure, Excel’s formulas became familiar over time.
The same is true of M in Power Query; we just need to become more familiar with the M code functions. The complete reference library can be found here.
The great thing about Power Query in Excel, is we can easily take a copy of a workbook, and practice as much as we like, knowing it will not break anything. Once we feel comfortable, we can bring that knowledge into a live situation.
Archive and Knowledge Base
This archive of Excel Community content from the ION platform will allow you to read the content of the articles but the functionality on the pages is limited. The ION search box, tags and navigation buttons on the archived pages will not work. Pages will load more slowly than a live website. You may be able to follow links to other articles but if this does not work, please return to the archive search. You can also search our Knowledge Base for access to all articles, new and archived, organised by topic.
