
Having covered the basics of the Excel Data Validation feature in the first part of this series, this time we are going to look at the use of the Custom option to construct more complex data validation rules including preventing duplicate entries.
Introduction
Excel’s Data Validation feature can be very useful in helping to ensure that users enter the correct information into input cells. In this series we will look at some of the less obvious capabilities of the feature. Part 1 covered the basics of Data Validation before moving on to the use of formulas, functions and cell references to calculate the criteria values used as part of the standard ‘Allow’ options. This time we will look at the use of the Custom option to create criteria based solely on an Excel formula.
Custom
Reject all changes
When selecting the Custom option in the Allow: dropdown list the Data Validation dialog will display a Formula box. If the formula evaluates to TRUE, the entry will be allowed, but if it is FALSE the Error Alert will be triggered. Accordingly, if you just want to stop someone changing the existing entry in a cell, you could enter the formula as =FALSE directly, remembering the necessity of beginning the formula with =. You might wonder what the point of this would be, given that you could use cell locking and sheet protection to stop someone changing the contents of a cell. Wonderful as Excel Tables are, they do have a very significant drawback when using sheet protection. A Table on a protected sheet cannot expand to include new rows, making it impossible to use cell locking to protect a column of formulas in a Table. Using custom Data Validation is an option to decrease (though not eliminate) the chances of cell contents in a formula column being changed accidentally. Of course, if someone is determined to change a cell, without sheet protection they would be able to remove the data validation.
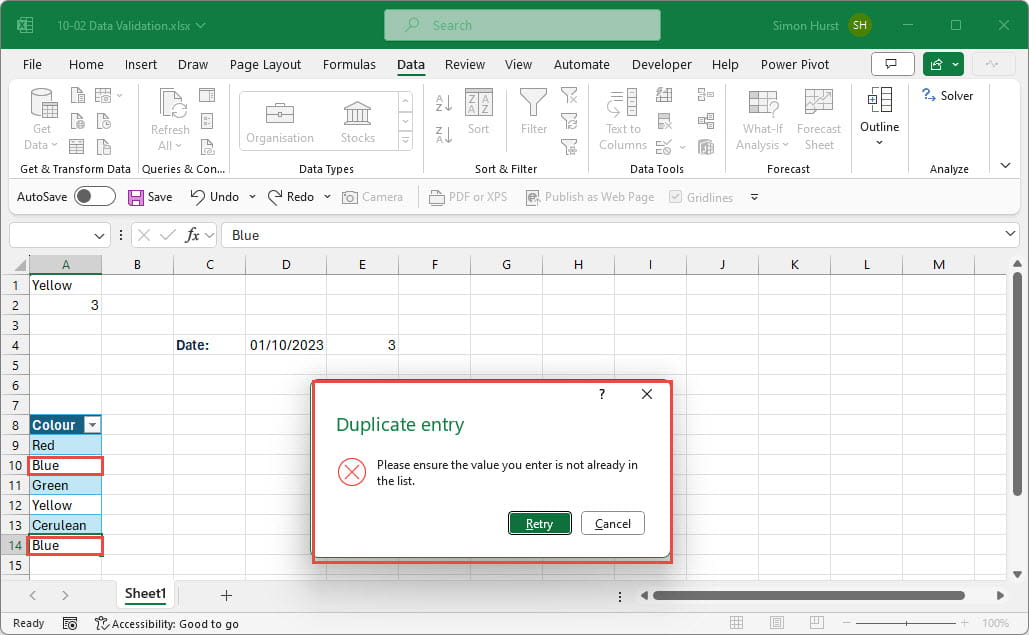
Only accept unique entries in a list
As an example of a more advanced data validation rule, we will look at using a Custom formula to prevent duplicate entries in a list. We are going to use the COUNTIFS() function to count the number of items in a list that match the new entry and only accept entries that result in a value of 1. We could also achieve the same result using the COUNTIF() function. Note that when entering a function in the Data Validation dialog, AutoComplete and syntax help will not be available, so you might want to first enter the required formula in cell to check what you need to enter in the Data Validation dialog.
The COUNTIFS() function takes a range as its first argument and then a series of criteria, each of which must evaluate as TRUE, to compare each value in the list against. So, in our case our range will be our list of colours and we want to check each item in the list to see how many times it occurs. We compare the result of the COUNTIFS() function with the value 1, so the overall formula only returns TRUE when the value in the cell to which the Data Validation is applied only occurs once:
=(COUNTIFS(ColoursList,A9)=1)
There are several things to note about this formula. We are using an Excel Table for our list of colours, but Data Validation doesn’t allow the direct use of Table structured references in its formulas, so we can’t refer to our column using Colours[Colour] as we could if entering the formula in a normal Excel cell. We could use the INDIRECT() function to use our Table and column names, but this has several drawbacks including significantly increased complexity. Instead, we have opted to use an Excel Range Name to refer to our column. This will expand and contract automatically as cells are added to, or deleted from, the column. We have entered our criterion cell as the top left cell in our column. As our reference is relative, this will automatically adjust to refer to the current cell in each of our Data Validation cells.
When we try to accept an entry, our formula is evaluated for our current cell. If the entry in that cell is already in our list, the COUNTIFS() function will return 2 or higher. Only if our new entry is unique in the list will the function return 1, and the formula therefore TRUE. Otherwise, our entry will be rejected, and our Error Alert message will be displayed:
Conclusion
For more articles on Data Validation, search the ICAEW Excel Community article archive.Archive and Knowledge Base
This archive of Excel Community content from the ION platform will allow you to read the content of the articles but the functionality on the pages is limited. The ION search box, tags and navigation buttons on the archived pages will not work. Pages will load more slowly than a live website. You may be able to follow links to other articles but if this does not work, please return to the archive search. You can also search our Knowledge Base for access to all articles, new and archived, organised by topic.