
The Name Box has more uses than just being the quickest way of allocating a Range Name to a selected cell or a selected range. It can also be the quickest way to navigate around a big worksheet.
Introduction
To the left of the Formula Bar in Excel lies the Name Box. Perhaps most commonly used as the quickest way to allocate an Excel Range Name to the currently selected cell or range of cells, the Name Box can also be used for navigation and selection.
Using the Name Box as a box for names
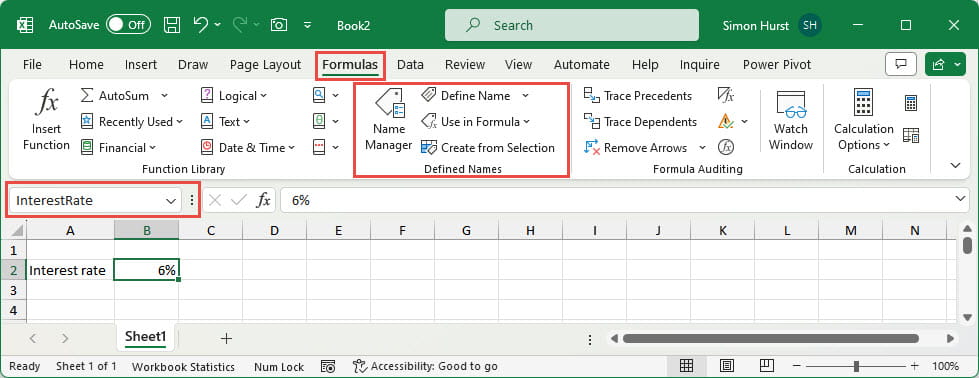
First of all, we’ll look at the standard use of the Name Box. If we wanted to allocate the Range Name ‘Sales’ to cell A2, we can select A2 and then just type Sales into the Name Box. Having entered the name into the Name Box, we have to press the Enter or Return key to accept it. Once created, when we click on cell A2, rather than the usual cell reference, the Name Box will display the name attached to the cell. Further operations for creating and managing Range Names can be accessed in the Formulas Ribbon tab, Defined Names group.
It's worth noting that there are restrictions when creating names. Names cannot include spaces or certain other special characters and cannot start with a number. When creating a Range Name that includes multiple words, the underscore character is often used to replace spaces:
Interest_Rate
Alternatively, you can capitalise each word.:
InterestRate
Just to the right of the Name Box itself, the three vertical dots divider can be dragged to the right or left to adjust the amount of space available to enter and display names.
One of the most useful aspects of using Range Names is the ability for a spreadsheet user to see a Range Name in a cell formula and then quickly select the associated cell to review or change the value. Clicking on the Name Box dropdown displays a list of all names in the workbook including Range Names and Table names. Clicking on any name will select the cells that the name refers to.
One of the most useful aspects of using Range Names is the ability for a spreadsheet user to see a Range Name in a cell formula and then quickly select the associated cell to review or change the value. Clicking on the Name Box dropdown displays a list of all names in the workbook including Range Names and Table names. Clicking on any name will select the cells that the name refers to.
Selecting cells using the Name Box
It’s not only names that the Name Box can be used to select. You can type any valid reference into the Name Box and it will be selected. If you want to select a cell on another worksheet you just have to enter the name of the worksheet and the cell reference, separated by an exclamation mark. If your sheet name includes spaces, then, just like in a formula, you will need to surround the name in apostrophes:
‘Data Basics’!A1
Using the Name Box for selecting cells or ranges can be particularly useful when getting to the cell would otherwise require lots of scrolling.
‘Data Basics’!A1
Using the Name Box for selecting cells or ranges can be particularly useful when getting to the cell would otherwise require lots of scrolling.
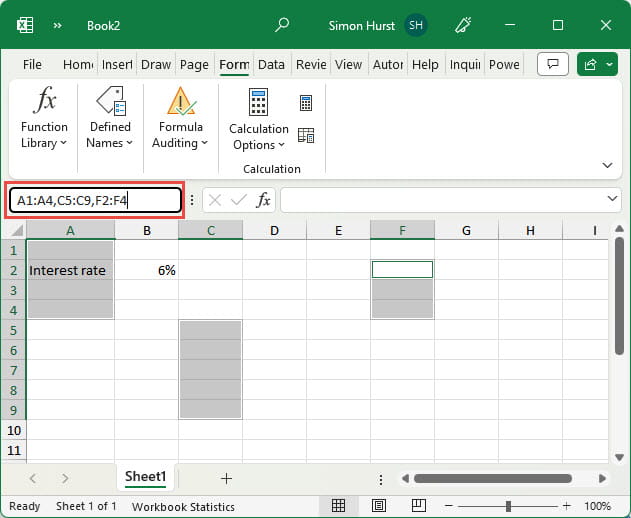
Selecting ranges
If you enter a range in the Name Box, then that range will be selected. It is even possible to select multiple individual cells, or multiple ranges, by separating each cell reference or range with commas.
A1:A4,C5:C9,F2:F4
A1:A4,C5:C9,F2:F4
Related links
Archive and Knowledge Base
This archive of Excel Community content from the ION platform will allow you to read the content of the articles but the functionality on the pages is limited. The ION search box, tags and navigation buttons on the archived pages will not work. Pages will load more slowly than a live website. You may be able to follow links to other articles but if this does not work, please return to the archive search. You can also search our Knowledge Base for access to all articles, new and archived, organised by topic.