
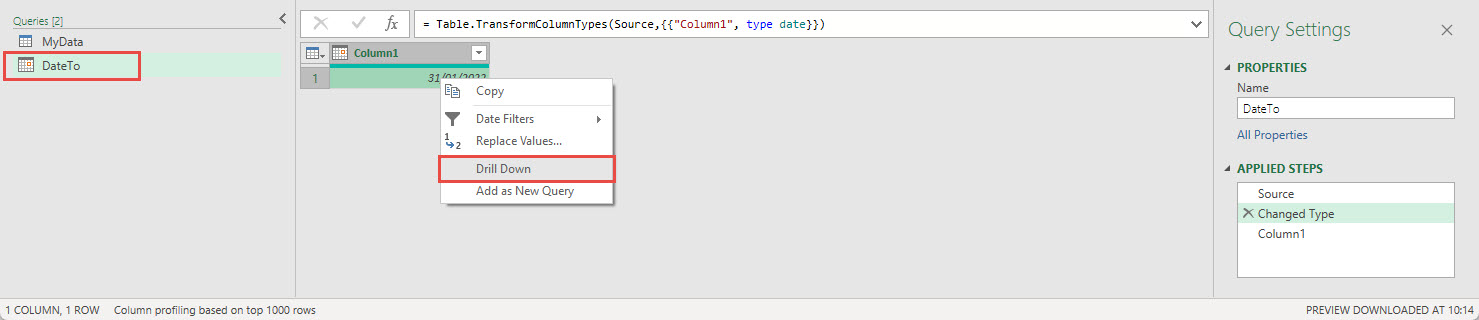
Having looked in recent years at all sorts of ways in which Power Query can automate the manual and solve the insoluble, in this series we are delving a little deeper into how Power Query works to show how it can be made to do even more. Although most of the time we can achieve what we need just by using the Power Query editor interface and leaving Power Query to create the underlying processes for us, knowing something about how the Power Query formula code works and how to make small changes to the code Power Query has created for us, or even adding our own lines of code, can extend our capabilities significantly. If you are not used to working with code, working with lines of Power Query code is similar to entering functions in Excel cells but with some important differences.
Editing steps
In this part, we will look at making a simple edit to an existing formula line.
As we saw last time, using commands from the editor interface creates new steps in our APPLIED STEPS list and, with the Formula Bar visible, we can see the code behind each new step. It is a good idea to display the Formula Bar and, for certain steps, to check the formula that Power Query has created. The editor does take decisions on our behalf that we might want to check. For example, depending on the number of values involved, a filter might be created as checking that items are equal to the values selected individually from the list of existing values, or that items are not equal to the values that were not selected. This can make a significant difference to the results of the filter process when further items are added.
For this example, we have updated our previous example and added a cell to the original worksheet to contain a date for the user to input to apply a filter to our output:

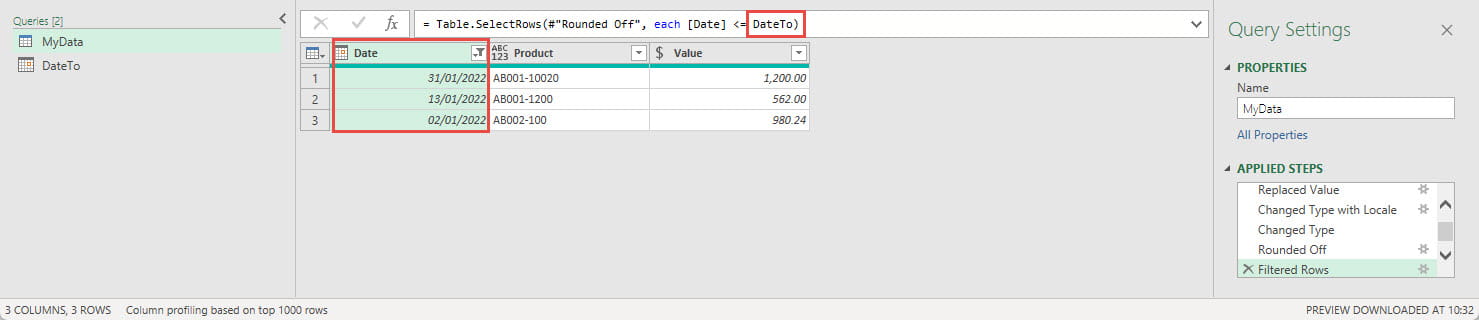
We have used the Name Box to the left of the Formula Bar to apply the Range Name ‘DateTo’ to our input cell. We can then select our cell and use the Data Ribbon tab, Get & Transform Data group, From Table/Range command to load our named range into the Power Query editor. If we look at the formula that Power Query has created for us as the Source step, we can see that it has retrieved the content of a Range Name “DateTo” from the current workbook:
= Excel.CurrentWorkbook(){[Name="DateTo"]}[Content]

This converts our table into a single value that we can refer to by its name: DateTo.
We want to use this value to filter our transaction table. If we use the drop down in our Date column header to set a filter, we can choose from a range of different Date Filters. As the name of our input value suggests, we want to include all values up to, and including, that date. The closest option in the list is Before…, but when we choose this, the detailed screen allows additional choices include ‘is before or equal to’. We can then enter a date value, but ‘DateTo’ will just be treated as text and generate an error, so we will enter any date instead as a temporary value:

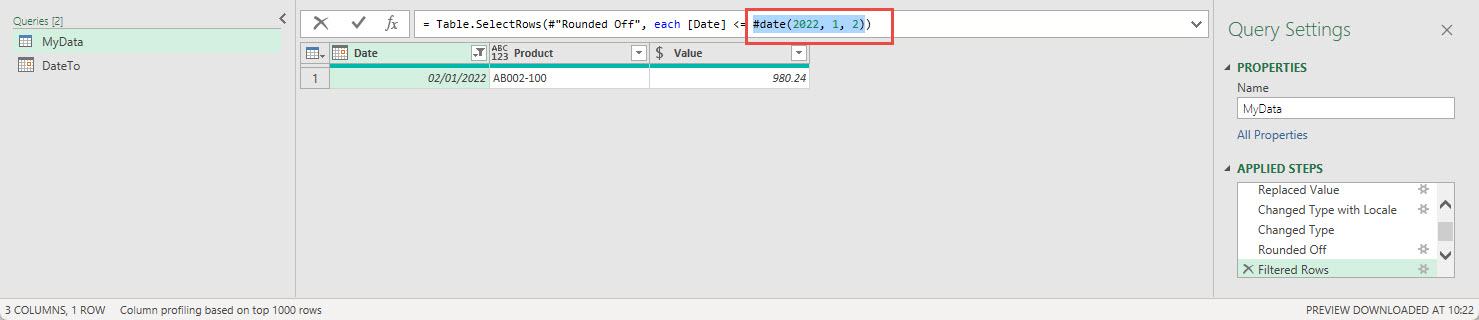
Here you can see our filter date appears in our formula as:
#date(2022, 1, 2)
We select all of this and replace it with dateto:
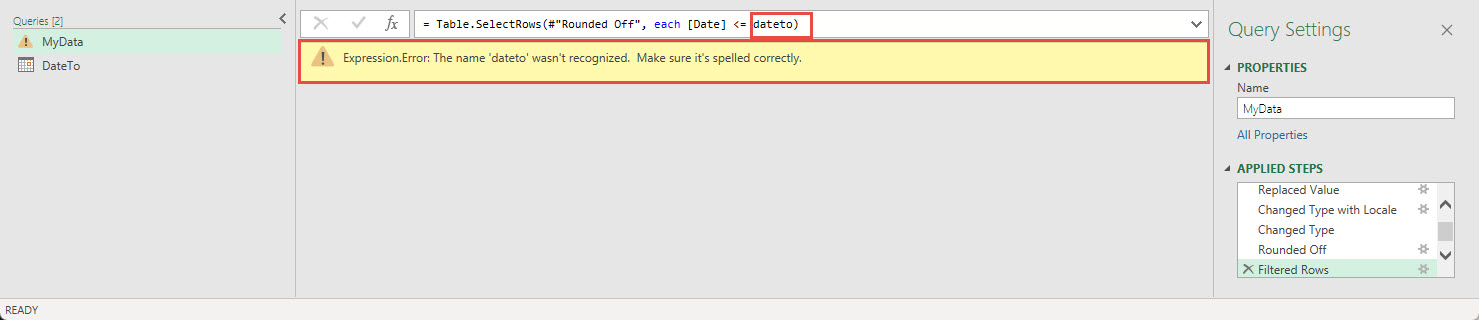
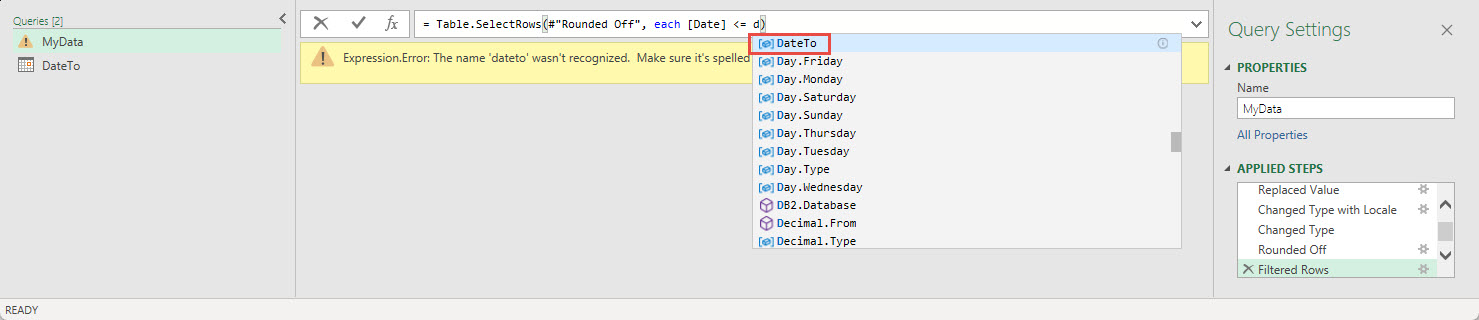
Useful as AutoComplete is in helping us to find the functions and values we need, and to enter them correctly, it does suffer from one particular irritation. If you start typing in a function name, you can successfully select the full name from the AutoComplete list as long as you haven’t got as far as the full stop in the name. Once you have typed the full stop, selecting your chosen function from the list will concatenate what you have typed, up to the character before the full stop, with the full function name:
dateDate.AddMonths
Conclusion
This example has demonstrated how the Formula Bar is not just useful in helping to check how our interface actions have been translated into the underlying formula, but that it also allows us to edit the formula in the formula bar to extend what we are able to achieve. It’s worth noting that editing the code directly can often be avoided by clicking on the ‘gear’ icon displayed to the right of certain steps. This will open the original dialog that was used to create the step, allowing the formula to be changed by the Power Query editor, rather than making manual changes in the formula bar.
Next time we will investigate formula lines further and look at using the ability to add columns to create our own formula in a similar way to using an Excel function in a worksheet cell.
Archive and Knowledge Base
This archive of Excel Community content from the ION platform will allow you to read the content of the articles but the functionality on the pages is limited. The ION search box, tags and navigation buttons on the archived pages will not work. Pages will load more slowly than a live website. You may be able to follow links to other articles but if this does not work, please return to the archive search. You can also search our Knowledge Base for access to all articles, new and archived, organised by topic.
